In Fitnesse FREE tutorial series next article we are going to discuss and understand about the procedure to create, maintain and execute a new FitNesse test as a mini project.
Understanding the System under Test:
Before we begin our testing on any project, we need to understand its FRD (Functional Requirement Document), SRS (Software Requirement Specification), etc. After going through these documents, clearing all our doubts, then we need to write the test cases. As an example we are going to test a basic calculator system developed in Java language which does addition, subtraction, multiplication and division.

System under Test:
System under test is defined as the entire software application which does a number of functions such that accepts inputs from end user and deliver meaningful output. In the current example, the system under test is the calculator program as shown below. While conducting user acceptance test, the entire system under test is considered as a black box.
Writing test cases:
As discussed earlier in this tutorial, writing test cases has a format as shown below. Based on the function points from the system under test, below tabular test cases are carved which will later automated using Fitnesse tool.
| Test Case ID | Input parameters | Result output | Expected Output | Status |
| TC1 | Enter any numeric values for two operands for addition. | It will add two numbers. | Pre-set expected value on FitNesse page. | PASSED (marked in green color) |
| TC2 | Enter any numeric values for two operands for subtraction. | It will subtract two numbers. | Pre-set expected value on FitNesse page. | PASSED (marked in green color) |
| TC3 | Enter any numeric values for two operands for multiplication. | It will multiply two numbers. | Pre-set expected value on FitNesse page. | PASSED (marked in green color) |
| TC4 | Enter any numeric values for two operands for division. | It will divide two numbers. | Pre-set expected value on FitNesse page. | PASSED (marked in green color) |
Writing Java Fixture for FitNesse:
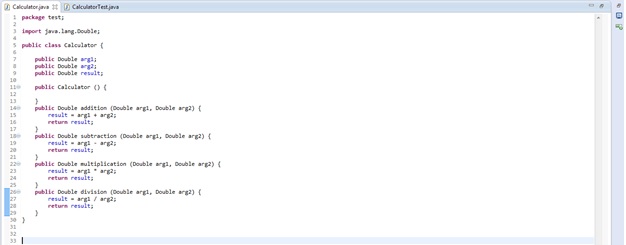
We have a system or software application ready to test, testing team has finished writing the test cases and which are reviewed and approved by the supervisor. Next is to start working on FitNesse tool. In FitNesse tool, we first need to write Java code Fixture. Java code fixture for above test cases to test the system is shown below.
- Since we need to do the mathematical operations on two operands therefore, in the Java code fixture we have declared two variables “firstArgument” and “secondArgument” and their corresponding setter methods.
- Next as per our four test cases, we have defined four getter methods that calls the system under test calculator functions to get the result and return that value to the FitNesse page. In the Java fixture those four getter methods are “additionTest”, ”subtractionTest”, ”multiplicationTest” and “divisionTest”.

Creating a new FitNesse Test:
After we have finished writing the Java code fixture, now we can starting working on the development of actual Java FitNesse page. Below are the steps to accomplish that.
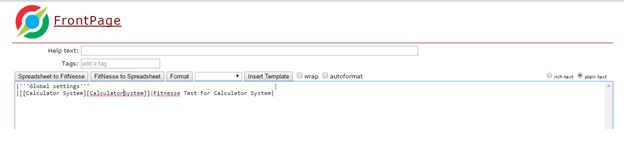
Step 1: Go to the FitNesse front page and write the script as shown below. Here the first text ((“Calculator System”)) between ([ ]) is the name of the test which will be displayed on the FitNesse test page, the second text (“CalculatorSystem”) between square bracket ([ ]) is the actual name of the path directory where the actual FitNesse test script will be located and the last text (“FitNesse Test for Calculator System”) is the description field. After writing this script click on the save button present at the bottom of the page.
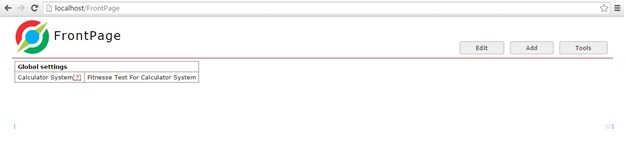
Step 2: If we notice that the second text (“CalculatorSystem”) between square bracket ([ ]) is in the camel case. Anything we write on the FitNesse page as camel case and when we save that page, it prompts with a question mark hyperlink as shown below. This is how FitNesse understand the need to create a new FitNesse test page.
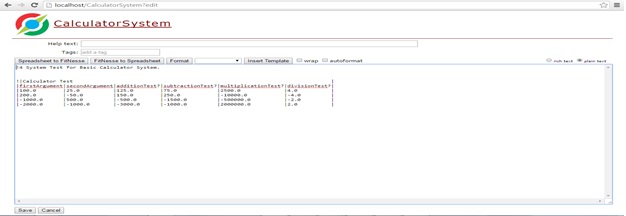
Step 3: Click on the question mark as seen on the FitNesse test page. It will open up a new page where we can edit and write the FitNesse test script as shown below. As discussed in the past chapters, FitNesse script starts with name of the Java Fixture or actor which is in camel case and can be separated here as individual word of the camel case as shown below, this forms the first line of the decision table. Next line in the decision table is the setters and getters which corresponds to the Java code Fixture. After these two first rows, we can now specify the values for setter methods and pre-defined expected result value for the getter method for actual test. Once script is completed, we can click on the save button present at the bottom of the current page as shown below.
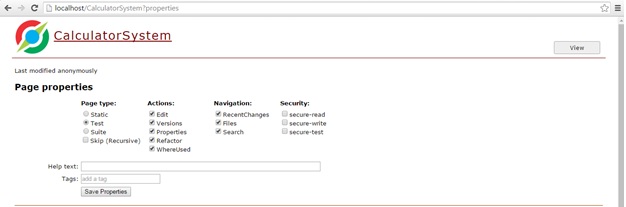
Step 4: Any new page created in FitNesse is by default static page, in order to change the current page as a test page navigate to the right top corner of the page and mouse over on to the “Tools” hyperlink that will display the “Properties” option in the dropdown menu. Click on the “properties” option from the dropdown menu, it will display the page as shown below. Check the radio button “Test” and click on the “Save Properties” button to change the property of current page from static to test page.
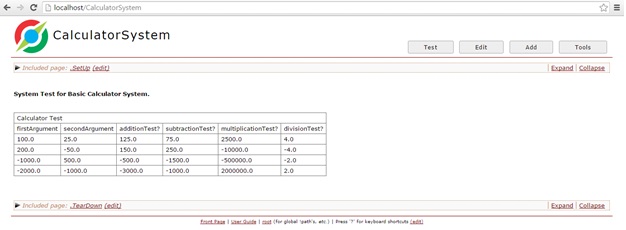
Step 5: After change of page property to test, actual FitNesse test page for “Calculator System” will be displayed as shown below. At this step, the decision table will be seen with fixture or actor name in the first row followed by the name of setter methods without question mark and setter methods with question mark. Next we can mention as many rows of operand that we want to test. In the below example, we have taken a mix of positive and negative values of the operand for maximum test coverage.
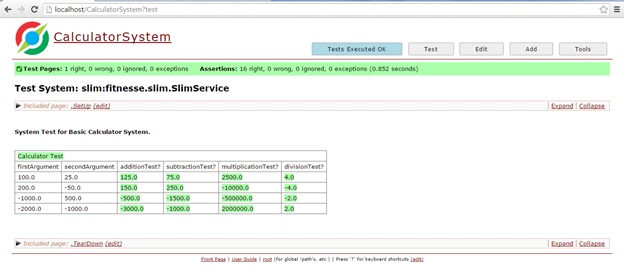
Step 6: At this step, we are all set to hit the Test button present at the top right corner of the FitNesse test page. When Test is complete, below screen will be visible marked with green or red color as shown below. If return result from system under test matches with the expected output present on the page, FitNesse tool will mark that cell of the table with green color. If the return result from system under test does not matches with the expected output on the page, FitNesse tool will mark that cell of the table with red color.

⇓ Subscribe Us ⇓
If you are not regular reader of this website then highly recommends you to Sign up for our free email newsletter!! Sign up just providing your email address below:
Happy Testing!!!
Happy Testing!!!
