In exercise 1, you learned that how to add steps to the Mercury Tours Welcome page.
In this exercise 2, we will see the addition of steps while recording process of the FlightFinder action, on the Flight Finder page. This implementation will use the test objects from the linked Mercury Tours FlightFinder shared object repository. Also, we will learn that how to add step in SelectFlight Action.
Let’s start the implementation,
First, in UFT window open the Mercury Tours test.
Open UFT window with the Mercury Tours test and ensures that the Web Add-in is loaded, only.
To open Solution Explorer window, select File > Open > Solution. The Open Solution dialog box opens.
Open Mercury Tours 1 solution created earlier.
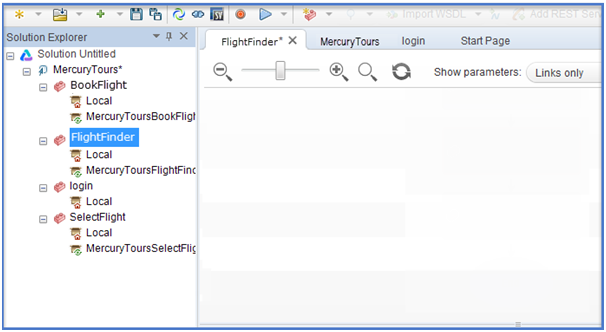
Second, open the FlightFinder action through the Mercury Tours tab in the document pane.
In the canvas of the Mercury Tours, double-click the FlightFinder action. The FlightFinder action opens.
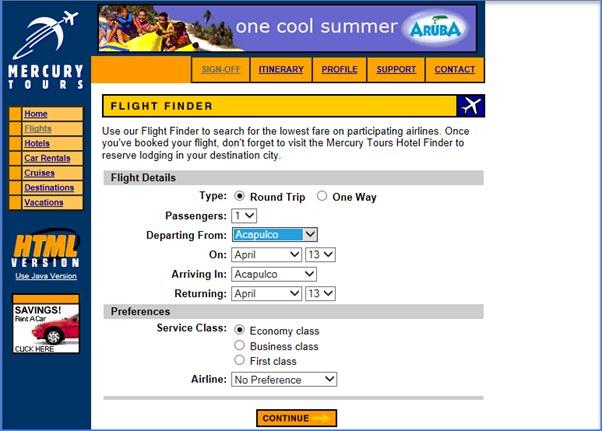
Third, open the Flight Finder page in the Mercury Tours Web site.
To do so, open the Mercury Tours Web site (http://newtours.demoaut.com) in Microsoft Internet Explorer. The Mercury Tours website welcome page opens.

In the Find a Flight area of the Mercury Tours website welcome page, enter the User Name and Password to Sign-In. The Flight Finder page opens.
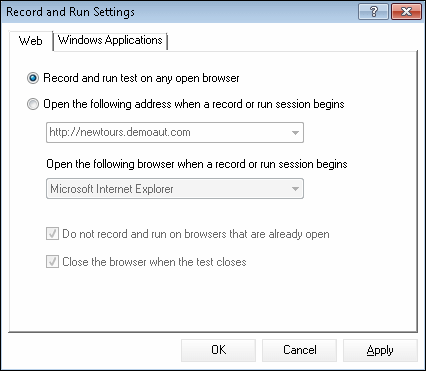
Fourth, go to Record > Record and Run Settings. The Record and Run Settings dialog box opens.
In the Web tab of Record and Run Settings dialog box, select Record and run test on any open browser then click on “Apply” and“OK”. This enables UFT to record on the open Web page.
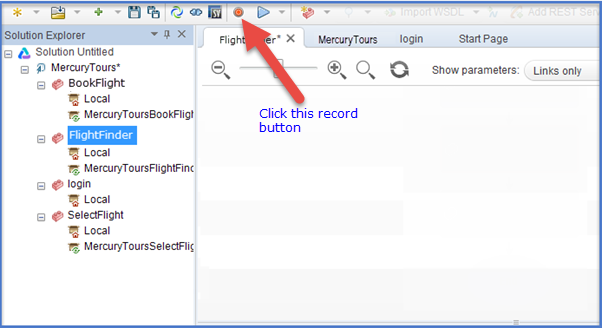
Fifth,in UFT, click the Record button. The recording toolbar opens. It disappear the UFT window and start recording on Mercury Tours Web site page, the Flight Finder page.
In the Mercury Tours Flight Finder Web page, change the following selections without any changes in the calendar option.
- Departing From: New York
- On: December 29
- Arriving In: San Francisco
Click on “CONTINUE” button for further process. The Select Flight page opens.
Sixth, in the Recording toolbar, click on “Stop” button to stop the recording process.Save the created test by clicking on “Save” button.
The above process will record the Mercury Tours website operations (Reservation from New York to San Francisco) from when you clicked the Record button in UFT until you clicked Stop on the Recording toolbar.
Seventh, after doing above step, do not close the UFT. Next, add a Step to the SelectFlight Action using the Toolbox Pane.
To do so, in UFT window, select Record > Record and Run Settings to do required settings to add a step to the SelectFlight Action. The Record and Run Settings dialog box opens.
In the Web tab of the Record and Run Settings dialog box, check“Open the following address when a record or run session begins” option and choose the web site: “http://newtours.demoaut.com”.
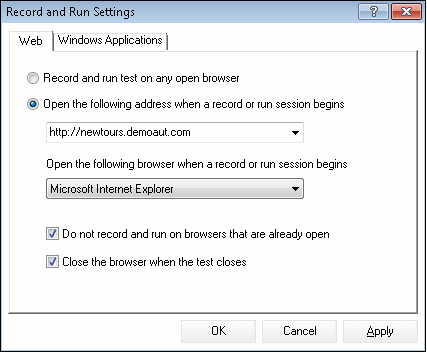
Also, check the two options have been selected,
- Do not record and run on browsers that are already open
- Close the browser when the test closes
If not then select it, then click on “Apply” and “OK” to save the changes and close the dialog box..
While adding a step in the SelectFlight action, drag the relevant test object into the action from the Toolbox Pane.
Eight, open the SelectFlight action by double-clicking on the SelectFlight action in the Solution Explorer window. The SelectFlight action opens.
Next, check the Toolbox Pane is opened or not, if not then open it from Toolbox button. The Toolbox pane works in both the Editor and the Keyword View.
Ninth, select the object that represents the CONTINUE button on the Select Flight Web page.
In the Toolbox Pane, expand the Test Objects tree.Locate and drag the reserve Flights Image object into the action, in either the Editor or the Keyword View. The reserve Flights Image object should be close to the top of the list of objects in the Toolbox Pane
The Image test object is added to the step with the default method, Click.
In the Editor, the step displays as follows:
Save the test by selecting File > Save.
⇓ Subscribe Us ⇓
If you are not regular reader of this website then highly recommends you to Sign up for our free email newsletter!! Sign up just providing your email address below:
Happy Testing!!!