The working experience on Web API project testing is really important while doing web service testing. In this article, I want to cover sample Web API project testing using SoapUI. I am going to assume that our readers are already went through the SoapUI tutorial series and a better understanding of what is Web API testing, how to use the SoapUI web service testing tool etc.
Wanna take a quick recap? Check this out.
Introduction:
API stands for Application Programming Interface and the term Web API refers to API for either a web server or a web browser. Web API is at server-side in case of a Web server and it is at the client side in case of web browsers. In this tutorial, we are going to develop a server-side Web API project using RESTful web service which could be accessed either through a web URL/URI or a client program.
Let’s understand the first server-side and client-side Web API before we get into a Web API project.
Server-side Web API:
As the name suggests, server-side web API is an endpoint interface which is exposed publicly through web URL or URI to serve the response for the request sent by the client program; the response message is in the format of XML, Plain Text, HTML and JSON. Request response message system is achieved through HTTP protocol based request and response through Restful Web Service. There are different kinds of Server-Side Web APIs known as Mashups, Webhooks, and Web API Endpoints.
- Mashups: It is a type of web application that uses multiple Web APIs present on multiple Web Servers to serve any HTTP request.
- Webhooks: It is a peer to peer web architecture which transfers a request from one webserver to another web server. Here the webs APIs present on each Web Server take the requests as URI (Uniform Resource Identifier). The server itself acts a client to dereference the received URI and passes it to another server to trigger an event which is handled by destination Web API present on that server. Thus, known as webhooks.
- Endpoint: It is one of the aspects to interact with Server-Side Web APIs. They are accessed by URI as a HTTP request for which the response is sent to the client program or a third party software in the desired format. Endpoint Web Services are known to be static and should not change their location through which they provide the required responses.
Client-side Web API:
It is a type of Web API which extends a programmatic interface within the HTTP client or Web Browser at Client-Side. Commonly they are known to be the native plugins within the client program or standard JavaScript bindings. E.g., Plugins present in web browsers (like Firefox, etc.) to replace the native mobile application with new applications with HTML5.
Sample Web API Project (RESTful Web Service):
System requirements:
- JRE 8.
- Tomcat Web Server.
- Eclipse IDE.
- Jersey Jars (JAX-RS APIs).
- Web browser.
Sample RESTful API Project:
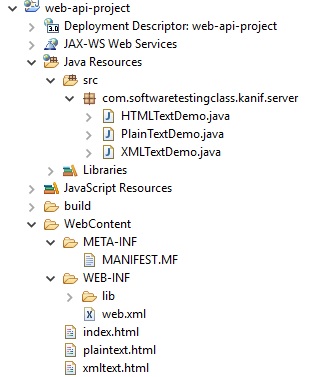
Below in this tutorial, we are first going to develop a sample RESTful API project and then we will understand how to set it up into SoapUI for testing the request and response. The below screenshot demonstrates the eclipse file hierarchy for Web API project. Download and place all the Jersey jars into WEB-INF/lib directory and set up web.xml as we did in the last tutorial for the REST Sample Project. Next, we are going to create and discuss actual JAVA files which actually forms RESTful web APIs.
Web API JAVA Project file hierarchy is given below:
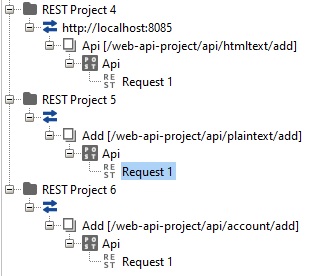
SoapUI REST project file hierarchy is given below:
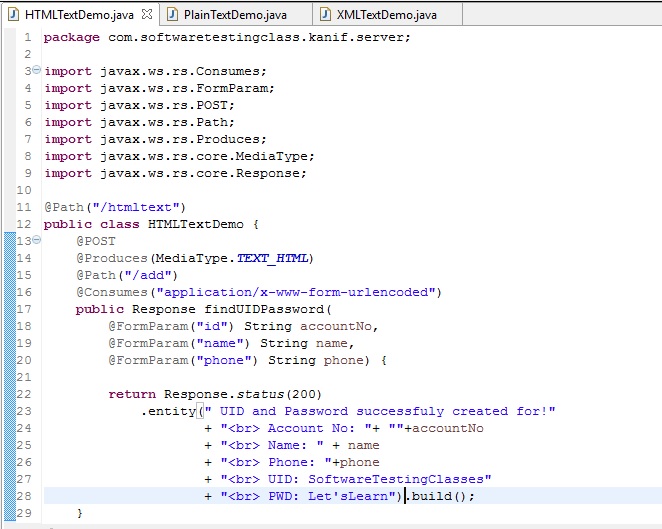
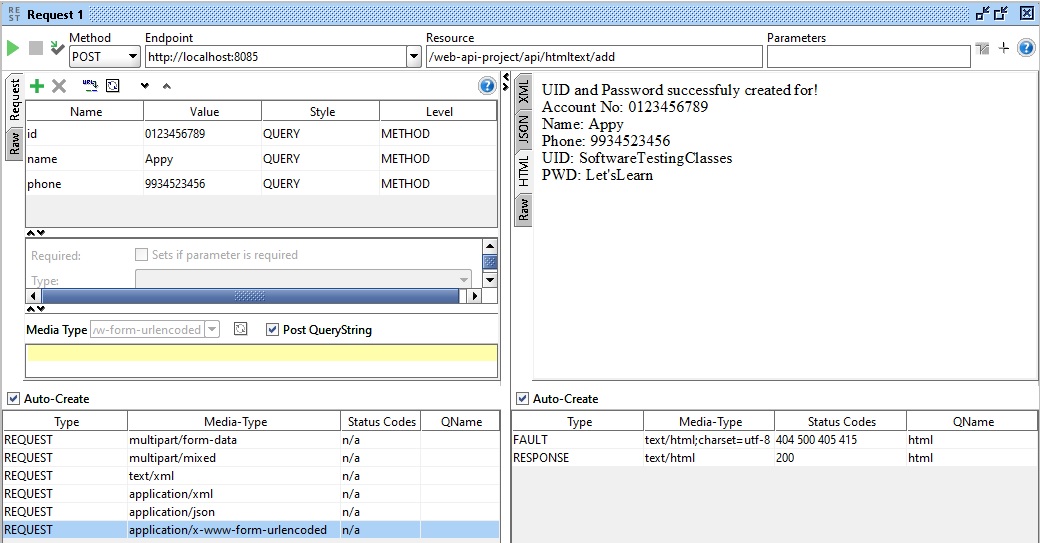
1) HTMLTextDemo: Screenshot for this JAVA file is given below. This class has a method known as This method is the actual web API service which accepts three request parameters as id, name, and phone by POST method and provide the HTML response data. @Path (“/htmltext”) annotation represents the path where this class can be looked up, @Path(“/add”) annotation represents the path where method findUIDPassword can be looked up. @Consumes(“application/x-www-form-urlencoded”) annotation represents the type of request data this method can accept from request and annotations such as @FormParam(“id”), @FormParam(“name”) and @FormParam(“phone”) are the actual form parameters received from the request. Based on all this information API produces a valid 200 response whose type is TEXT_HTML which is represented by annotation @Produces(MediaType.TEXT_HTML). This Response is thrown as Web API response when looked up with resource URL as “/web-api-project/api/htmltext/add”.
To test this Web API on SoapUI is very simple, below are the steps.
- As learned in the last tutorial, open a new REST project and provide the endpoint “http://localhost:8085″and Resource URL “/web-api-project/api/htmltext/add” where this Web API is located.
- Select the drop-down menu to select the method as POST.
- Set the request parameters id, name and phone with desired values. Select style as QUERY and Level as METHOD from the respective drop-down menus for each of the request parameters as shown in the below screenshot of SoapUI.
- Select the Media type as “application/x-www-form-urlencoded” and check the checkbox for Post query string.
- Once everything is set as discussed above, trigger the green arrow button at the left corner to run the test.
- HTML Response from Web API will be visible on the right response pane after clicking the vertical HTML response tab as shown in the below screenshot.
- Based on this above test setup. As learned earlier in this test series, the tester can set up the Test suite and within it, the required number of the Test cases using assertions to do functional testing, load testing, and security testing.
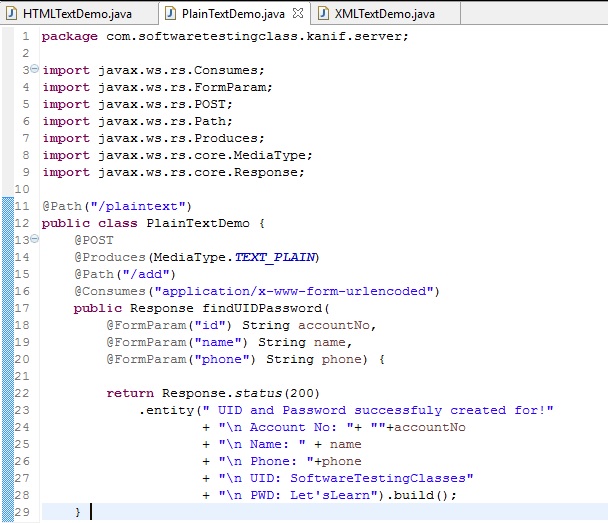
2) PlainTextDemo: Screenshot for this JAVA file is given below. This class has method known as This method is the actual web API service which accepts three request parameters as id, name, and phone by POST method and provides the HTML response data. @Path (“/plaintext”) annotation represents the path where this class can be looked up, @Path(“/add”) annotation represents the path where method findUIDPassword can be looked up. @Consumes(“application/x-www-form-urlencoded”) annotation represents the type of request data this method can accept from request and annotations such as @FormParam(“id”), @FormParam(“name”) and @FormParam(“phone”) are the actual form parameters received from the request. Based on all this information API produces a valid 200 response whose type is TEXT_PLAIN which is represented by annotation @Produces(MediaType.TEXT_PLAIN). This Response is thrown as Web API response when looked up with resource URL as “/web-api-project/api/plaintext/add”.
To test this Web API on SoapUI is very simple, below are the steps.
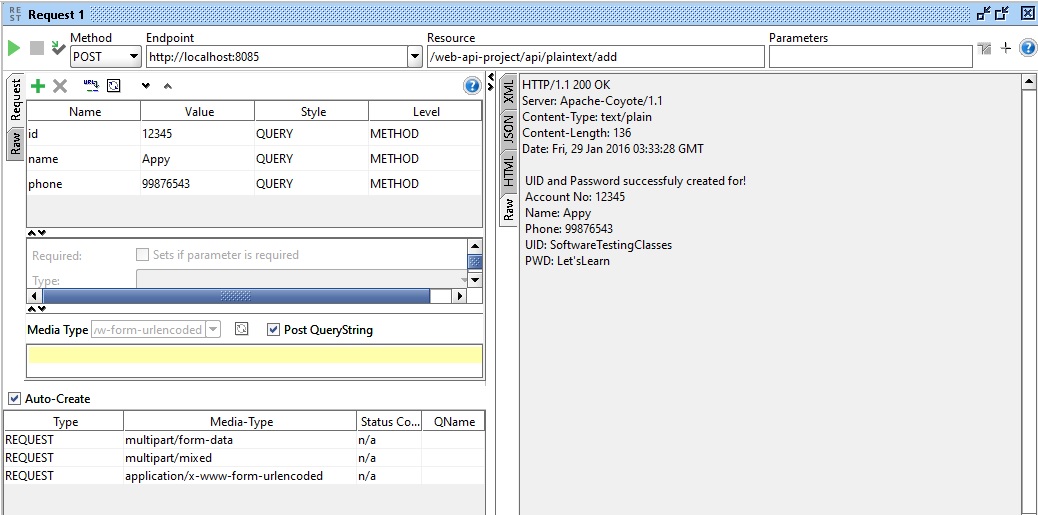
- As learned in the last tutorial, open a new REST project and provide the endpoint “http://localhost:8085” and Resource URL “/web-api-project/api/plaintext/add” where this Web API is located.
- Select the drop-down menu to select the method as POST.
- Set the request parameters id, name, and phone with desired values. Select style as QUERY and Level as METHOD from the respective drop-down menus for each of the request parameters as shown in the below screenshot of SoapUI.
- Select the Media type as “application/x-www-form-urlencoded” and check the checkbox for Post query string.
- Once everything is set as discussed above, trigger the green arrow button at left corner to run the test.
- Plain Text Response from Web API will be visible on the right response pane after clicking the vertical Raw response tab as shown in the below screenshot.
- Based on this above test setup. As learned earlier in this test series, the tester can set up the Test suite and within it, the required number of the Test cases using assertions to do functional testing, load testing, and security testing.
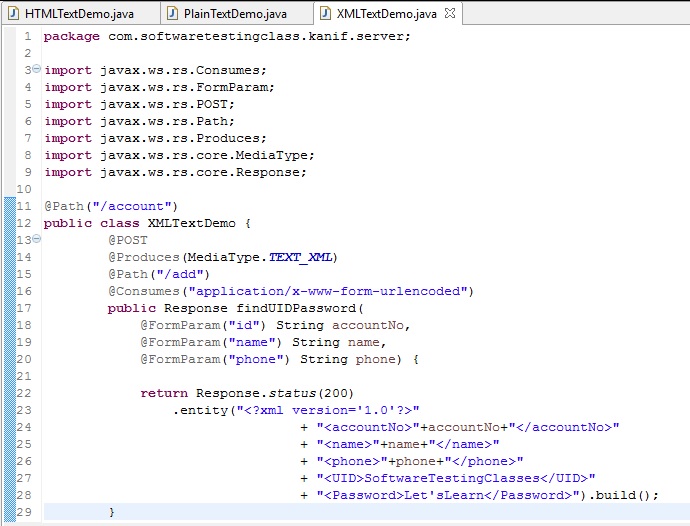
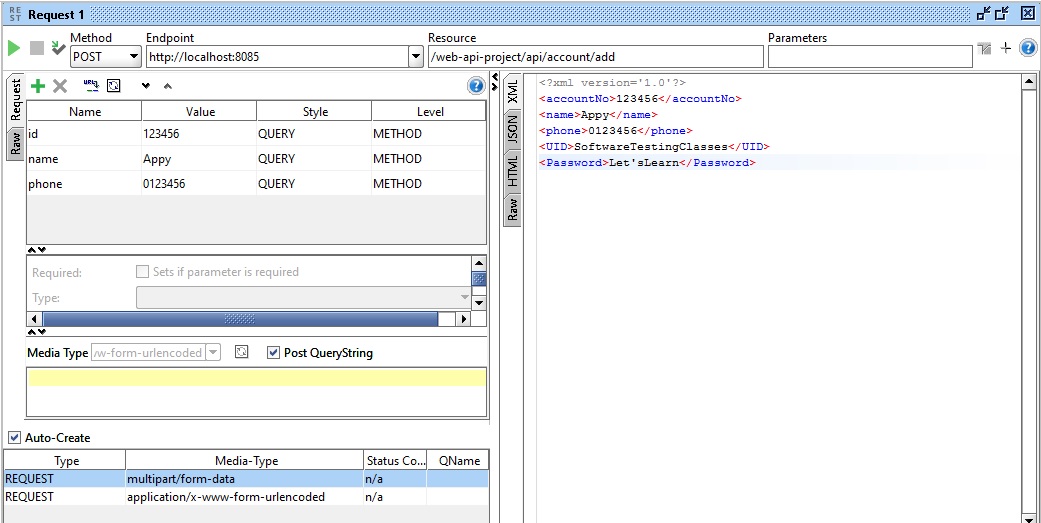
3) XMLTextDemo: Screenshot for this JAVA file is given below. This class has a method known as This method is the actual web API service which accepts three request parameters as id, name, and phone by POST method and provides the HTML response data. @Path (“/account”) annotation represents the path where this class can be looked up, @Path(“/add”) annotation represents the path where method findUIDPassword can be looked up. @Consumes(“application/x-www-form-urlencoded”) annotation represents the type of request data this method can accept from request and annotations such as @FormParam(“id”), @FormParam(“name”) and @FormParam(“phone”) are the actual form parameters received from the request. Based on all this information API produces a valid 200 response whose type is TEXT_XML which is represented by annotation @Produces(MediaType.TEXT_XML). This Response is thrown as Web API response when looked up with resource URL as “/web-api-project/api/account/add”.
To test this Web API on SoapUI is very simple, below are the steps.
- As learned in the last tutorial, open a new REST project and provide the endpoint “http://localhost:8085” and Resource URL “/web-api-project/api/account/add” where this Web API is located.
- Select the drop-down menu to select the method as POST.
- Set the request parameters id, name, and phone with desired values. Select style as QUERY and Level as METHOD from the respective drop-down menus for each of the request parameters as shown in the below screenshot of SoapUI.
- Select the Media type as “application/x-www-form-urlencoded” and check the checkbox for Post query string.
- Once everything is set as discussed above, trigger the green arrow button at the left corner to run the test.
- XML Response from Web API will be visible on the right response pane after clicking the vertical XML response tab as shown in the below screenshot.
- Based on this above test setup. As learned earlier in this test series, the tester can set up the Test suite and within it, required number of the Test cases using assertions to do functional testing, load testing, and security testing.
Sample RESTful Web API project can be downloaded from the below link:
Download Sample RESTful Web API project
Conclusion:
Today we learned about server-side and client-side Web API before we going into a Web API Project Testing.
Also covered Sample Web API Project (RESTful Web Service). You can also download a sample available RESTful Web API project for your better understanding.
⇓ Subscribe Us ⇓
If you are not regular reader of this website then highly recommends you to Sign up for our free email newsletter!! Sign up just providing your email address below:
Happy Testing!!!
