In this tutorial, we are going to discuss and learn about Scenario table and how such slim table can be used for BDD Style of testing.
BDD Stands for ‘Behavior Driven Development’. BDD “tests” exist at multiple different levels of granularity, all the way up to the initial project vision. Acceptance testing doesn’t actually mandate the conversations and it usually works from the assumption that these tests that we are writing are the right tests. In BDD, we assume that we don’t know what we’re doing and probably don’t know that we really don’t know. This is why we use things like “Given, When, Then, etc.”, so that we can have conversations around the scenarios and build our unit-level examples.
In FitNesse, we can achieve BDD style testing by using Scenario tables present in the slim testing engine. Below is the demonstration.
Scenario Table
Scenario tables in slim test engine can be defined as a way to express a sequence of abstract steps. Unlike the other slim table that we have seen in past chapters, scenario tables are not necessarily backed by a particular fixture. This means that, if we simply declare a sequence of steps in a scenario table, FitNesse, when run for test, will not attempt to do anything with it, therefore, we will not need a backing fixture for that. However, as soon as we define concrete tests on FitNesse page that use the scenario table, then we will be required to make sure a fixture is in place. This is to be noted that for the same Scenario table it is possible to be backed by different fixtures for different uses.
A Scenario table is a slim testing engine table that can be called from other tables such as Script Table and Decision Table.
To work with Scenario table, we need to do the following.
- Syntactically, Scenario table has the FitNesse reserved word “Scenario”. This word should be present in the first row and the first column of the table. The word “Scenario” in the table informs the slim processor which table type to execute.
- Scenario table can declare in two styles known as Interposed style and Parameterized style. Both of these styles are described below.
Below is the Interposed style of Scenario table declaration.
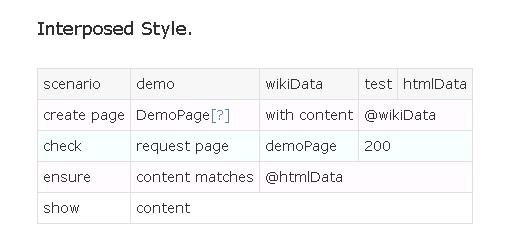
- Following the word Scenario is the signature of that scenario which is like a function declaration.
- In the above example, the name of the scenario in the table is DemoTest that takes two arguments: wikiData and htmlData.
- It looks like a function call in a Script Table.
- In the scenario table, the name in every other table cell should be appropriately camel-cased. Scenario names should be camel-cased with a leading upper-case letter and the arguments should be camel-cased with a leading lower-case letter.
Below is the Parameterized style of Scenario table declaration.
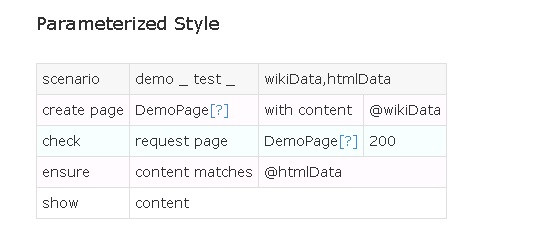
- In Parameterized style, the scenario is declared by embedding underscores within a string where each underscore represents an argument.
- The arguments are named in a comma-separated list in the following cell of the same row.
- The body of the scenario uses the arguments by prefixing them with an ‘@’ sign.
- This is to be noted that the token that follows the ‘@’ must be the camel-cased name of the argument.
- To force the correct evaluation of the full name of the argument, they can share a common root string and use optional braces, therefore, if we have arguments job and job code then we can use @{jobCode} to make sure that we get the argument with the longer name.
Example using Scenario table:
Below is the FitNesse test script where we have declared two scenario tables in a parameterized style known as “ShowValues” (show _ values _) and “ExecuteThisStep” (execute _ this _ step _). We are going to call this “ExecuteThisStep” scenario table from a decision table on the same page.
Few points to observe and remember
- The name of the decision table when camel-cased will be “ExecuteThisStep” from (execute _ this _ step _) which is the name of the above scenario.
- In this case, the scenario will be called rather than a fixture. This is important to remember that if a scenario is present or included on our page, then its name will be overridden by any fixture that has the same name. Remember here that the scenarios come first.
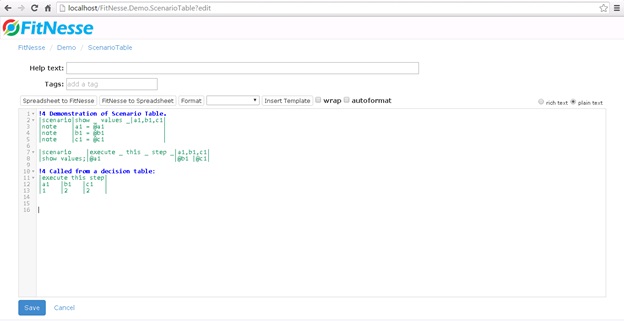
When we click on the save button present at the bottom of the FitNesse page, your test page will look like as shown below.
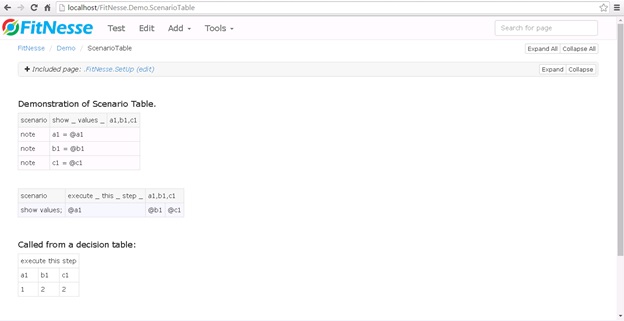
Above page has three slim tables as follows.
- The first table (show _ values _) is the scenario table that has three arguments a1, b1 and c1.
- Second table (execute _ this _ step _) is another scenario table that has again three arguments a1, b1 and c1.
- Third or the last table on the FitNesse page is a decision table which has fixture name as “ExecuteThisStep” which is actually calling the scenario table and passing the values to the arguments a1, b1 and c1.
- We add a number of rows giving the values that will add up to more number of scenarios.
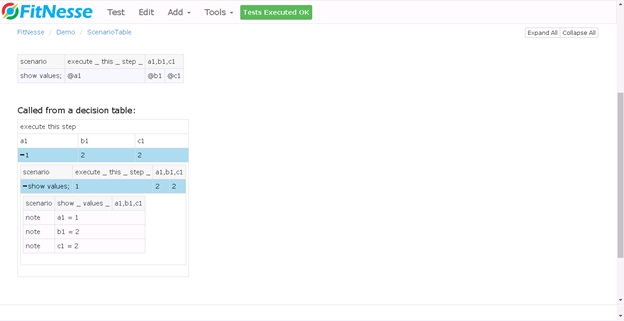
To begin the FitNesse page operation, click on the Test button present at the top of the page when the test execution has completed the output of the FitNesse test page with current setup is shown below. In the decision table we have given the set of values for @a1 = 1, @b1=2 and @c1=2 which are input to scenario table (“ExecuteThisStep”) where we called another scenario table (“ShowValues”) and copied these values to a1, b1 and c1 input arguments of this table which is displayed as the scenario summary as shown below.
This is how scenario table works with other tables such as decision table and script table and here we can observe one thing that there is no underlying fixture (Java Code) which is supporting the scenario tables and in fact they are acting as fixture to the decision table which is invoking them.

⇓ Subscribe Us ⇓
If you are not regular reader of this website then highly recommends you to Sign up for our free email newsletter!! Sign up just providing your email address below:
Happy Testing!!!
