In this tutorial, we are going to learn about Jira issue management, associated workflow for the resolution of such issue and the generation of various reports based on the issue resolution in detail.
Issue Management In JIRA
Let’s understand this with a real-life scenario where an application is live and into production. Somehow a defect left unveiled in an application as it remained unidentified either by the QA team or it is as a result of requirements gap in Functional Requirements Document (FRD). In a well-structured organization, production support or operations team is different from the project development team. Let’s understand the steps involved in the issue management.
- Issue Identification: When an application is into production and the operations team noticed a defect which may be reported either by clients or application stakeholders. The operation team analyses the defect as they notice the functional deviation of the application from its expected behavior and reports that defect to the project development team for its permanent fix. Here arises the need for a tool such as JIRA for defect logging and tracking until it gets resolved. Any detail that we enter into JIRA as a ticket is known as the issue. The issue is something that needs to be worked on. We can choose the issue type as defect and enter the associated description and summary and click the create button to create an issue ticket with a unique identification number in JIRA.
- Issue Analysis: Above step of issue identification is just report an incident but the actual analysis on the issue was not done. After the escalation of the issue to the project team who actually figures out where the gap is. Project team either modifies the summary or issue description after adding more details if needed.
- Issue Evaluation: After issue analysis, it is evaluated. In the evaluation step, it is decided what actually needs to be fixed, if it is a code change or just the reference data change or both. After issue evaluation, the estimated effort is calculated, severity and priority on the issue are decided and finally, it is assigned to the developer or required person to work and resolve. Developers may have doubts while working on the issue which he may add in the comments section in the JIRA which will be visible to the issue reporter as well its participants. By this way, the issue progress is communicated to all the intended issue participants.
- Active Implementation: Once complete knowledge on the issue is gathered such as what needs to be work on? The issue progress is tracked and it is expected from developers to do the unit testing before they can assign the implemented issue fix to the code review team.
- Monitoring & Review: Once issue fix is implemented and unit tested by the development team, it is assigned for code review to the veteran review team which may or may not suggest the code changes after comparing the code with the standard and best coding practices. After code review, the issue is assigned to the quality analyst team for testing and verification of the implemented issue. During the entire life cycle of the Jira issue management, it is monitored and tracked by the active participants. Also, whenever needed, such participants are free to comment on the issue progress and its updates.
After all of the above steps are followed, the issue fix is ready to be released to the production as a part of the application upgrade release which is often managed with a release version. Below diagram represents the issue management process with all of the above-discussed steps as a cycle.
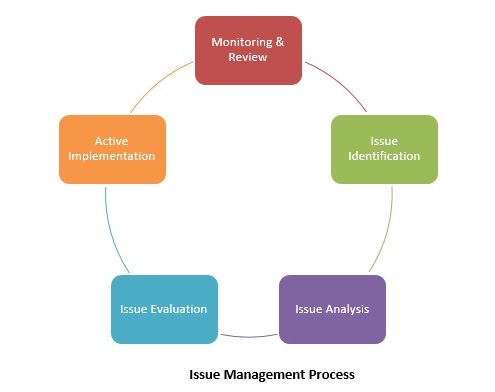
[Issue Management Process in JIRA]
Workflow In JIRA
Workflow in a particular business is defined as activities for known repeatable patterns enabled by the systematic organization of resources into a process that process information or provide services. In an IT industry for a scenario as discussed above it may involve following steps using JIRA tool.
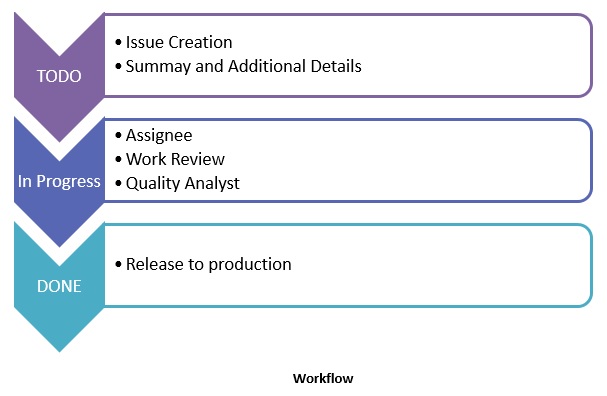
[Workflow in JIRA]
- Issue Creation: After operations team logs a defect into JIRA, the tool assigns a unique ticket identification number and the process is known as issue creation.
- Summary and Additional Details: Issue creation may be abstract and from time to time additional information is required to be added or updated related to the issue. Additional information could be issue description, severity, priority, components impacted, link, sub tasks, upload screenshots, email history, etc. After putting all above details into issue, JIRA assigns it a status known as TODO. This is the point when all known information about the issue is well organized at one place.
- Assignee: Issue is created in JIRA which is assigned to a person or team to work on it. At this point the status of the issue is changed to In Progress.
- Work Review: Work on the issue is monitored and reviewed by the issue participants such as issue reporter, assignee and other project management’s folks. As a part of workflow, issue after development is first unit tested by the developer, and then reviewed by the code review team. During this step of workflow the status of the issue remains as In Progress.
- Quality Analysis: After code review, the change is verified by the quality analyst team which includes the associated regression tests. If QA team observes any problem with the change they may assign back the issue to developer otherwise QA team may sign off on the change which states that the issue has been fixed and ready to get released into production. During this step of workflow the status of the issue remains as In Progress.
- Release to Production: Once issue is developed and tested, it is ready to get release into production and after sign off from the project management team; the status of the issue is changed to DONE.
This completes the workflow for JIRA issue management; all the above steps of the workflow are demonstrated below in the workflow diagram.
Dashboard In JIRA
JIRA tool provides the printable form of issue report in a very presentable manner for an individual issue and its progress as well as for the complete project as release notes in HTML and Text style. Also, the participants on JIRA can manage their own customized dashboard to keep the track on the issue which they are currently working on or monitoring.

[Dashboard in JIRA]
Release Note Configuration In JIRA
JIRA tool is allows you to configure release notes. It will ask you to configure the output and format of the project release notes.
Steps to configure the release notes in JIRA:
- In the navigation bar select Projects.
- From all projects list name, click on your project name.
- In sidebar section choose Versions.
- Select the Version for which you want to generate the release notes.
- To configure the release notes click on ‘Configure Release Notes’ link.
- Select the ‘Please select version’ from drop-down.
- Select the ‘Please select style’ drop-down. Possible values HTML and plain text format templates.
- Click on ‘Create’ button to generate the release notes with specified template. It allows you to copy paste the release notes.

[Release note Configuration in JIRA]
JIRA tool has its own Report section where it is possible to create following kinds of reports.
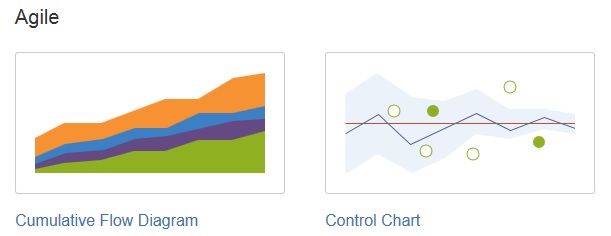
- Agile: This kind of report has cumulative flow diagram and control chart. The cumulative flow diagram shows the status of issues over time which will help to identify potential bottlenecks that need to be investigated. The control chart on the other hand shows the cycle time for the product, version, or sprint. This helps us to identify whether data from the current process can be used to determine future performance.
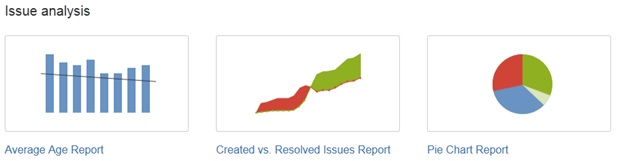
- Issue Analysis: JIRA provides three kinds of issue analysis reports such as average age report, created vs. resolved issues report, and pie chart report. Average Age Report shows the average age of unresolved issues for a project or filter. This helps in tracking the backlog which is being kept up to date. Created vs. Resolved Issues report maps created issues versus resolved issues over a period of time. It provides an idea of the overall backlog if it is growing or shrinking. The pie chart report shows a pie chart for a project grouped by a specified field. It provides a glance of the issues breakdown.
Forecast and Management Reports as follows:
JIRA helps in generating time tracking reports, user workload reports, and version workload reports. A time tracking report helps us to determine whether work is on track for those issues. User workload report helps us to understand the user’s workload better whereas version workload report helps us to understand the remaining work for the version.

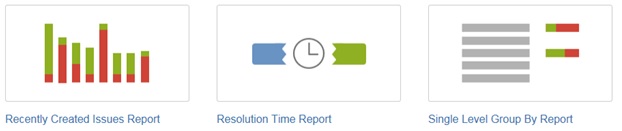
Other issue tracking reports are as follows.
- Recently created issues report, which helps in analyzing if team is keeping up with incoming work.
- Resolution time report, which helps in the identification of trends and incidents that we can investigate further.
- Single level group by report, which helps in searching results by a field and provides visibility in the overall status of each group.
- Time since issues report, which helps in tracking how many issues were created, updated, etc, over a period of time in a particular project.
In this Atlassian JIRA tutorial, we have learned about JIRA Issue Management, workflow, and Reporting feature. Do let us know your comments, questions and suggestions below and stay tune for next update.
⇓ Subscribe Us ⇓
If you are not regular reader of this website then highly recommends you to Sign up for our free email newsletter!! Sign up just providing your email address below:
Happy Testing!!!
