Checkout FREE Selenium Training series here if you missed earlier.
In this tutorial, we are going to learn about handling keyboard and mouse events using Webdriver. After this, we will deal with file uploads.
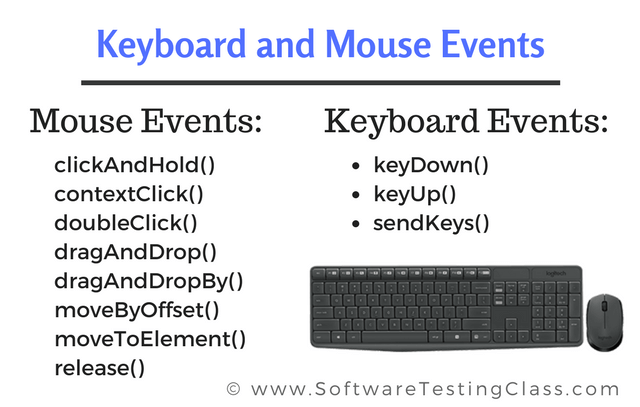
Handling Keyboard & Mouse Events using Webdriver:
Keyboard and mouse events are handled using the Advanced User Interactions API. It contains the Action classes which helps in handling execution of these events. Mouse events includes events like mouseover, mouseout, mouse move, mouse out, mouse hover, mouse enter, mouse leave, mouse moving to x and y coordinates on screen, etc. Following are the frequently used keyboard and mouse events provided by the Action classes.
| Sr No. | Method | Function Description |
| 1. | clickAndHold() | This method is used to click and hold (without releasing) on the current object at the current mouse location on a web page. |
| 2. | contextClick() | This method is used to perform a context click at the current mouse location on a web page. |
| 3. | doubleClick() | This method is used to perform a double click at the current mouse location on a web page. |
| 4. | dragAndDrop(source, target) | This method is used to perform first click and hold event on the current object and then move that object to the location of the target web element and release the mouse after that. It accepts two parameters.
· Source as a parameter accepts the element location at button down. · Target as a parameter accepts the object to move and release the mouse at target element. |
| 5. | dragAndDropBy(source, x-offset, y-offset) | This method is used to perform click and hold at the location of the source element and then moves off by a given offset (x-offset and y-offset) and then release the mouse. It accepts three parameters.
· Source as a parameter accepts the element location. · X-offset as a parameter accepts the horizontal offset. · Y-offset as a parameter accepts the vertical offset. |
| 6. | keyDown(modifier_key) | This method is used to perform a modifier key press when used it makes sure that subsequent interactions can assume it’s kept pressed. Modifier key as a parameter accepts key such as Keys.ALT, Keys.SHIFT, Keys.CONTROL, etc. |
| 7. | keyUp(modifier_key) | This method is used to perform a modifier key release event. As explained before modifier keys are Keys.ALT, Keys.SHIFT, Keys.CONTROL, etc. |
| 8. | moveByOffset(x-offset, y-offset) | This method is used to perform the mouse move from its current position to given offset (x-offset, y-offset). Negative value of x-offset means moving the mouse left and positive value means moving the mouse right. Negative value of y-offset means moving the mouse up and positive value means moving the mouse down. |
| 9. | moveToElement(toElement) | This method is used to move the mouse to the middle of the web element. It accepts one parameter which is the element to move to. |
| 10. | release() | This method is used to release the depressed left mouse at its current location. |
| 11. | sendKeys(onElement, charsequence) | This method is used to send a series of keystrokes on to a web element. It accepts two parameters.
· OnElement as a parameter accepts the element that receives the keystroke (like field text). · Charsequence as a parameter accepts the string value representing the sequence of keystrokes. |
Java Code using Actions API for mouse event:
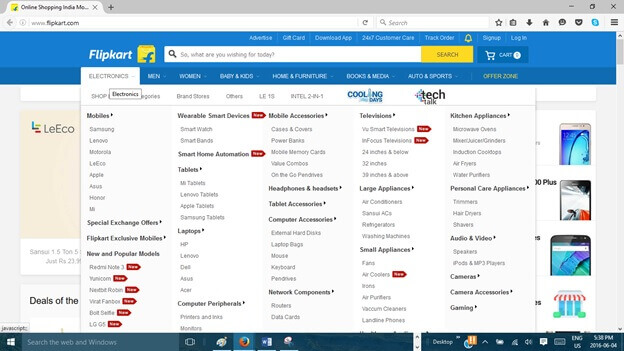
Following is the test script using Java language and Advanced User Interactions APIto trigger a mouse over event on a website hyperlink.
package seleniumpackage;

import org.openqa.selenium.By;
import org.openqa.selenium.WebDriver;
import org.openqa.selenium.WebElement;
import org.openqa.selenium.firefox.FirefoxDriver;
import org.openqa.selenium.interactions.Actions;
import org.openqa.selenium.interactions.Action;

public class MouseEvent
{
public static void main(String[] args)
{
/* declaration and instantiation of objects/variables */
WebDriver driver = new FirefoxDriver();
String baseWebUrl = "http://www.flipkart.com/";
driver.get(baseWebUrl);
/* get the actual value of the title */
WebElement headerelement = driver.findElement(By.linkText("ELECTRONICS"));
Actions builder = new Actions(driver);
Action mouseoverevent = builder.moveToElement(headerelement).build();
mouseoverevent.perform();
/* closing Firefox Browser and System */
driver.close();
System.exit(0);
}
}
Step by step explanation of test script for mouse event:
Step 1: Firstly, we need to import Actions and Action class from the Advanced User Interactions API as shown below.
import org.openqa.selenium.interactions.Actions;
import org.openqa.selenium.interactions.Action;
Step 2: Actions object instantiation. Here, we are calling the Actions class constructor that accepts current driver object as input parameter as shown below.
Actions builder = new Actions(driver);
Step 3: Use of Action object to perform mouse over event. Actions class’s object ‘builder’ instantiated in the step 2 has a method known as ‘moveToElement’ which accepts the web element object to act upon (here link text). Using the ‘build’ method that return the Action object (here mouseoverevent) as shown below.
Action mouseoverevent = builder.moveToElement(headerelement).build();
mouseoverevent.perform();
Step 4: Use the Action class’s ‘perform’ method to move the mouse over the link element that was selected and passed as object in step 3 as shown above.
Step 5: Close the driver object and exit the system.
In the following output, you will observe the following screen where “ELECTRONICS” link has mouse over to shown the dropdown menu on the popular flipkart website. Above test script first access the “ELECTRONICS” link then mouse over event display the dropdown menu.
Step 6: Execute the below test script as a Java program.
Similarly, other mouse events handling can be done by using various methods as discussed before depending on the test automation requirement using Webdriver.
Uploading Files:
We can upload the files using Webdriver API ‘sendKeys ()’ method on the web element that is nothing but the file select input box to accept the local path of the file to be uploaded.
In this tutorial, we are going to upload file to the website URLhttp://expirebox.com/. Following are the steps.
Step 1: Load the website URL http://expirebox.com/ using Webdriver API.
Webdriver driver = new FirefoxDriver();
String baseWebUrl = <a href="http://expirebox.com/">http://expirebox.com/</a>;
driver.get(baseWebUrl);
Step 2: Select the web element (Input box) that loads the file path by id (here ‘fileupload’ is the ID of input box). Use the ‘sendKeys ()’ method which has the local file path as parameter to upload the file. Before using the below test script, make sure the file exists at this location ‘C:\\selenium_demo\\HTML_Form.html’ on your machine.
WebElement element = driver.findElement(By.id(“fileupload”));
Element.sendKeys(“C:\\selenium_demo\\HTML_Form.html”);
Step 3: Close the driver object and exit the system.
Step 4: Execute the below test script as a Java program.
package seleniumpackage;

import org.openqa.selenium.By;
import org.openqa.selenium.WebDriver;
import org.openqa.selenium.WebElement;
import org.openqa.selenium.firefox.FirefoxDriver;

public class FileUpload {
public static void main(String[] args) {
/* declaration and instantiation of objects/variables */
WebDriver driver = new FirefoxDriver();
String baseWebUrl = "http://expirebox.com/";
driver.get(baseWebUrl);
/* get the actual value of the title */

WebElement element = driver.findElement(By.id("fileupload"));
element.sendKeys("C:\\selenium_demo\\HTML_Form.html");

/* closing Firefox Browser and System */
driver.close();
System.exit(0);
}
}
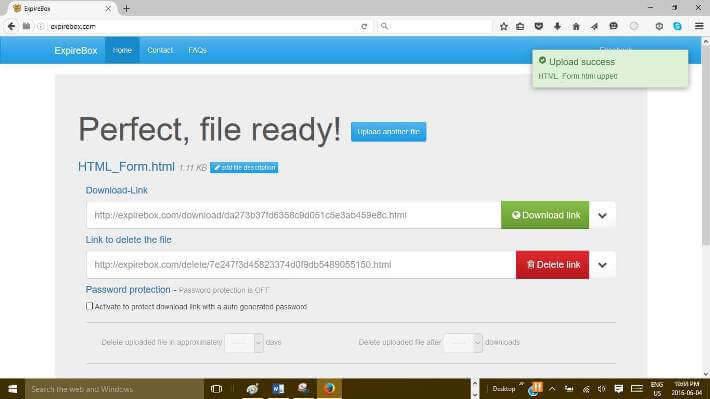
Output of above program is shown below. Here, the local html file (HTML_Form.html) is uploaded successfully by the above test script.The output screen display the message of successful file upload at top right corner. This approach can be applied to test other similar web URLs as long as file input box can be located by ID, name or XPath.
Download complete Selenium project: Selenium webdriver Project
Over to you:
In this chapter, we have learnt to handle the mouse events using various Advanced User Interactions API methods and file upload method.
