Here, we will take help of the UFT “Navigate and Learn” option to add objects from the Mercury Tours Web site to a shared object repository, and also we will learn that how we can associate the object repository with a test.
Let us create an object repository for Login action, to understand it better.
First, Start UFT to open the Mercury Tours test file, created earlier.Make sure, only the Web Add-in is loaded.
After opening the Mercury Tours test file, open Solution Explorer to see all objects related to Mercury Tours test file. If Solution Explorer is not opened in UFT window, go to View > Solution Explorer to open the Explorer.
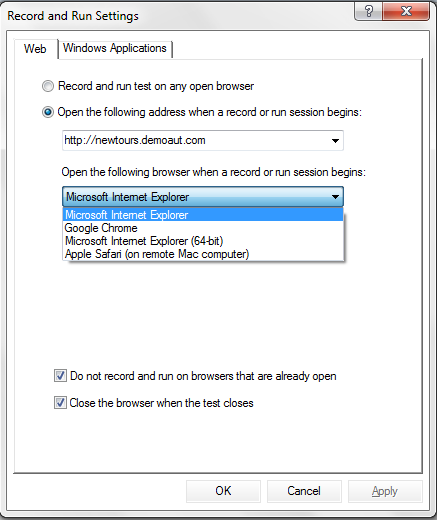
Second, do some settings under Record and Run Settings dialog box.
For that, go to Record > Record and Run Settings. The Record and Run Settings dialog box opens.
Under Web tab of Record and Run Settings dialog box just check the option“Open the following address when a record or run session begins” and make sure that the URL from drop down list should be “http://newtours.demoaut.com”selected. Also, select the browser on which the test will run, here we will choose Microsoft Internet Explorer to run the test. There are some more browsers that UFT supports, shown in the figure below.
In the Record and Run Settings dialog box confirms that the two options: “Do not record and run on browsers that are already open” and “Close the browser when the test closes”are also checked.
After doing all required settings, click on “Apply” and then “OK”.
The above settings result will record the web application steps during test. In this case, the selected browser will open to the Mercury Tours Web site and when the record or run session ends, the browser will automatically get closed.
Conform that Mercury Tours Web site: “http://newtours.demoaut.com”opens in a selected browser, should be in maximized mode. Also, conform that the fresh new IE browser window opens after opening UFT, because UFT may not recognize the object properly from the browser opened before UFT.
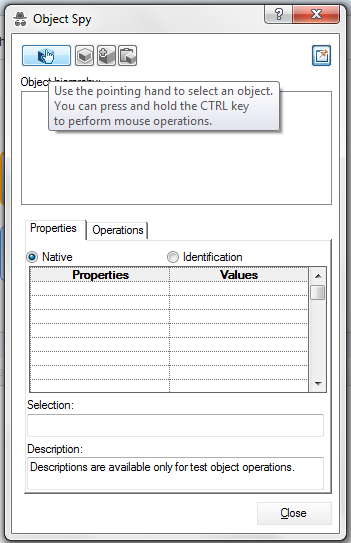
Third, to check some activities of objects and properties perform on the Mercury Tours Web site, click the Object Spy toolbar button to open Object Spy dialog box, under UFT. Drag and drop the Object Spy dialog box to the right side of the UFT window to see the objects you want to spy, more clearly. Conform that the “Keep Object Spy on top while spying toggle” button is pressed.
From the Object spy dialog box, click the pointing hand button.
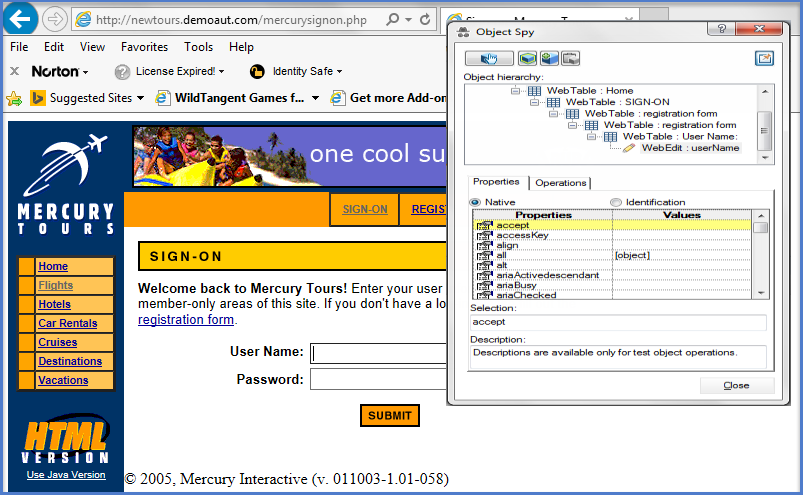
Once you click on pointing hand button, UFT becomes hidden and the Object Spy dialog box displays over the Mercury Tours Web site welcome page then move the mouse cursor over the various objects on the welcome page of Mercury tours website to see what is happening on the Object Spy dialog box. To do so, just place the mouse cursor in the “User Name”text box without click it, while doing this the test object hierarchy of that particular object displays in the Object Spy dialog box displays name of the object “WebEdit” is basically an object class type.
Then, click on the “User Name”text box to switch back the Object Spy dialog box displays on UFT window where the Object hierarchy box displays the Object_Class:Object_Name= WebEdit: userName. Close the Object Spy dialog box.
Fourth, set up the “Define Object Filter” to begin the “Navigate and Learn” method.
Here, UFT only learn and add the objects to the object repository that are required for a test. UFT maintain object repository at the minimum.
To do this, go to Resources > Object Repository Manager to open Object Repository Manager window.
Once the Object Repository Manager window opens, select Object > Navigate and Learn.
Once you click on Navigate and Learn, both UFT and the Object Repository Manager window disappears to appear the Navigate and Learn toolbar with a message box (open first time when you try to open the Navigate and Learn toolbar) displays a tooltip opens, click on “OK” to activate the Navigate and Learn toolbar.
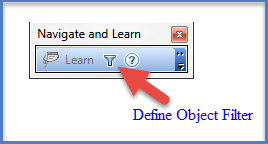
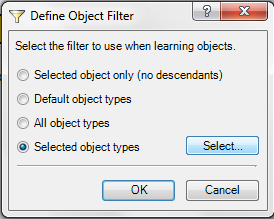
In the Navigate and Learn toolbar, click on the Define Object Filter button. The Define Object Filter dialog box opens. Check the option“Selected object types” and then click on Select. This process opens the “Select Object Types” dialog box.
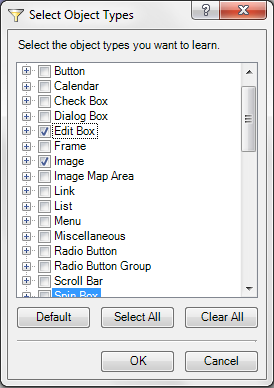
Once the “Select Object Types” dialog box opens, you will see that all check boxes will be selected, to clear all check boxes click on “Clear All” then only select the “EditBox”and “Image”check box options and click “OK”, shown in the figure below.
Then, in the Define Object Filter dialog box, click OK.
Fifth, from the Welcome page, Learn the selected object types.
Here, UFT will learn the objects that match the filter you defined in “Select object Type” dialog box from Welcome page of the Mercury Tours Web site and add those objects to a shared object repository.
Next, go to the Mercury Tours Web site Welcome page, click the “Learn”from the Navigate and Learn toolbar. The Web page flickers and the Adding Objects message box are displayed as UFT adds representations of the objects on the Web page to a new object repository. After completion of task, close the Navigate and Learn toolbar. After closing the Navigate and Learn toolbar, the UFT and the Object Repository Manager window will be enabled.
Sixth, take out extra objects from the object repository.
In the above process, we have added the objects that match to the filter selection to the object repository. If all objects are not required for testing process, you can delete the unnecessary objects.
To do so, go to the Object Repository Manager window, expend the Test Objects tree of particular object that is not required for testing. The list of objects will be like given below figure.
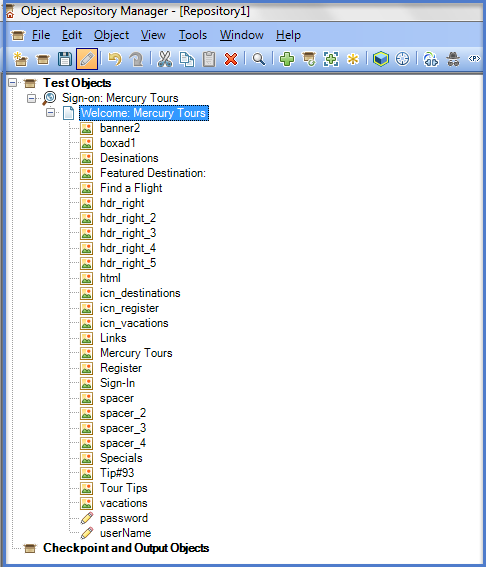
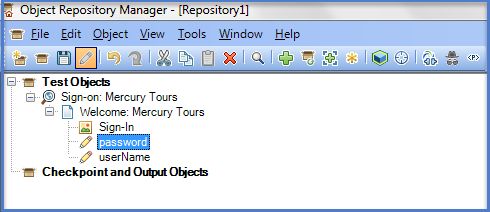
You can delete all of the test objectsexceptSign-In (image), userName (edit box) and password (edit box) and press Delete. Click “Yes” in the confirmation box.
If mistakenly you deleted Sign-In (image), userName (edit box) and password (edit box), undo it by going to Edit > Undo.
Once objects extraction process gets over, the tree will look like given below figure.
Seventh, let’s have a look on what UFT learned.
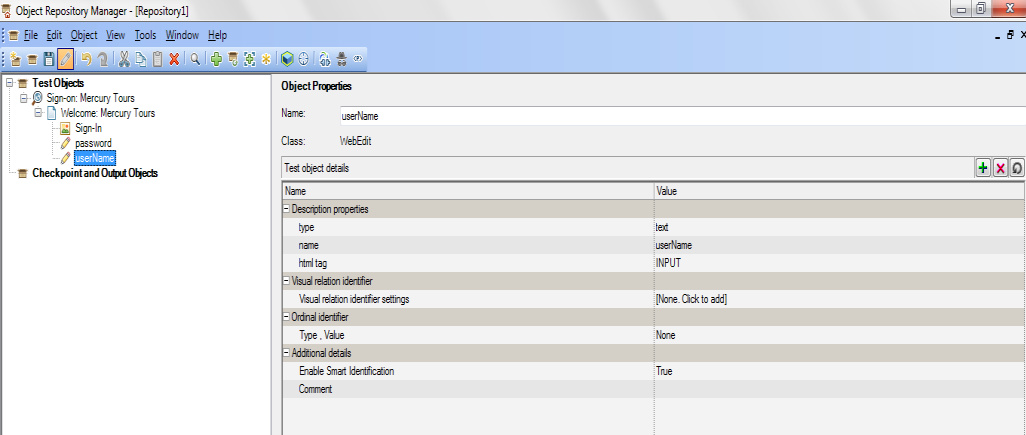
Click on userName object from the Test Objects tree to see properties of that particular object. UFT uses these properties to recognize the object during a run session.
Eight, at last Save the object repository. To do this, click on “Save” in the Object Repository Manager window to open “Save Shared Object Repository” dialog box. Choose the location where you want to save the file, it saves in .tsr format.
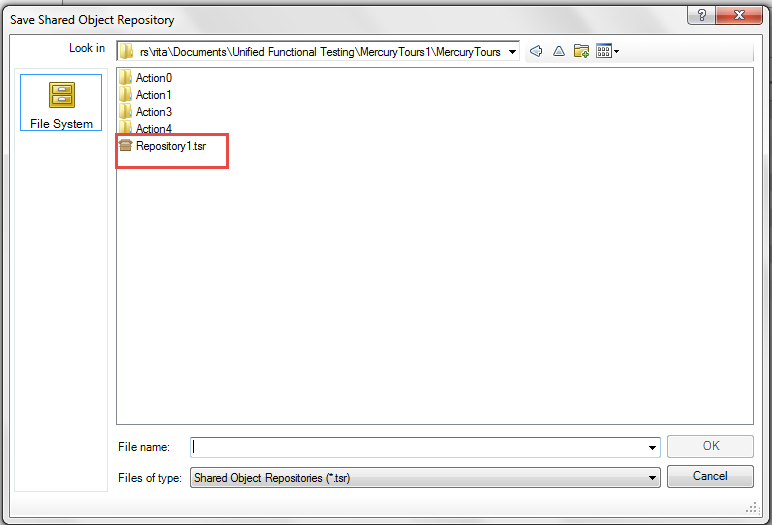
In this exercise, we created an object repository “Repository1.tsr”. Saved file will look like given above figure.
Conclusion:
In today’s Object Repository exercise we have learned about how to Save Objects of a web application. In next article on Object Repository Exercise 2 we are covering “How to Save Multiple Object Repositories“.
⇓ Subscribe Us ⇓
If you are not regular reader of this website then highly recommends you to Sign up for our free email newsletter!! Sign up just providing your email address below:
Happy Testing!!!


1 thought on “Object Repository Exercise 1: Learn and Save Objects of a web application – UFT/QTP Training Tutorial 8.1”
Hi,
congrats, you are doing a great training material,
I hope you’ll continue creating more for UFT,
Thanks again!