In this module we will start with TestNG and TestNG Annotations. Why people use the combination of TestNG with Selenium in the market. Also why can’t we use TestNG as standalone, these are the most common question which people asks. So starting with the article look at the following pictorial diagram:
This image is tells you that what actually JUnit or TestNG does. This is a simple architecture of a framework in selenium. Whether it is keyword driven, data driven, Hybrid or modular framework etc, I am not talking about any specific framework but this is general architecture i.e. on the right hand side I have some Selenium Test Scripts.
We can add n number of selenium scripts each repressing different standalone test case to execute. And on left hand side I have excel files for which I can read the data for the execution between the tests. I have got the responsibility of generating the reports that what happened in which test case, whether it Passed or Failed or Skipped. If case is failed then record what the error was occurred for failing the test case. Along with that I have to also generate the logs that what happened at what point of time. Suppose your script is running for 4-5 hours then you wanted to know what happened at which time. So collaborate and control everything we use TestNG or JUnit framework.
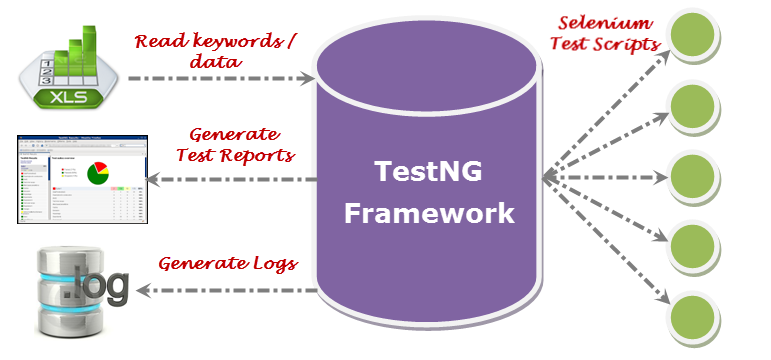
The Selenium Test Scripts are out here on the right hand side, on left hand side we have configurations and on the center we have the core part called Controller. The controller is either TestNG or Junit, so we recommend you to learn either TestNG or JUnit. Both are similar to each other but it has some potential differences. The TestNG with Selenium is very famous because we get very good reports in TestNG and easy to execute.
Let’s start learning concepts of TestNG which will help us to make & execute the framework. Before going ahead in TestNG we need to install TestNG in eclipse.
Basics of TestNG Annotations
Let’s check what all other different annotations present in TestNG.
List of TestNG Annotations & its actual use:
| Annotation | Description |
| @Test | Marks a class or a method as part of the test. |
| @BeforeSuite | This method is executed before executing the all test cases present in the test suite. |
| @AfterSuite | This method is executed after executing the all test cases present in the test suite. |
| @BeforeClass | Annotates methods that will be run before the first method on the current test class is run. |
| @AfterClass | Annotates methods that will be run after the last test method on the current class is run. |
| @BeforeTest | Annotates methods that will be run before any method in a given is run. |
| @AfterTest | Annotates methods that will be run after all the test methods in a given have been run. |
| @BeforeGroups | Annotates methods that will be run before the first method in any of the specified groups is run. |
| @AfterGroups | Annotates methods that will be run after the last test method belonging to the groups specified in its value attribute has been run. The annotated method is automatically put into these specified groups. |
| @BeforeMethod | Annotates methods that will be run before each test method. |
| @AfterMethod | Annotates methods that will be run after every test method. |
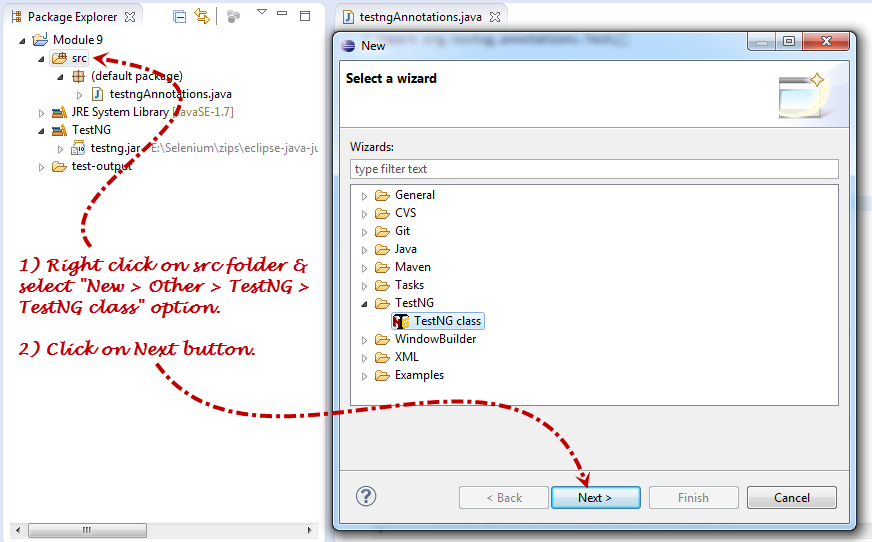
You can choose the Annotations from list of TestNG annotations while adding TestNG Class. Right click on src folder > New > Other > TestNG > TestNG Class.
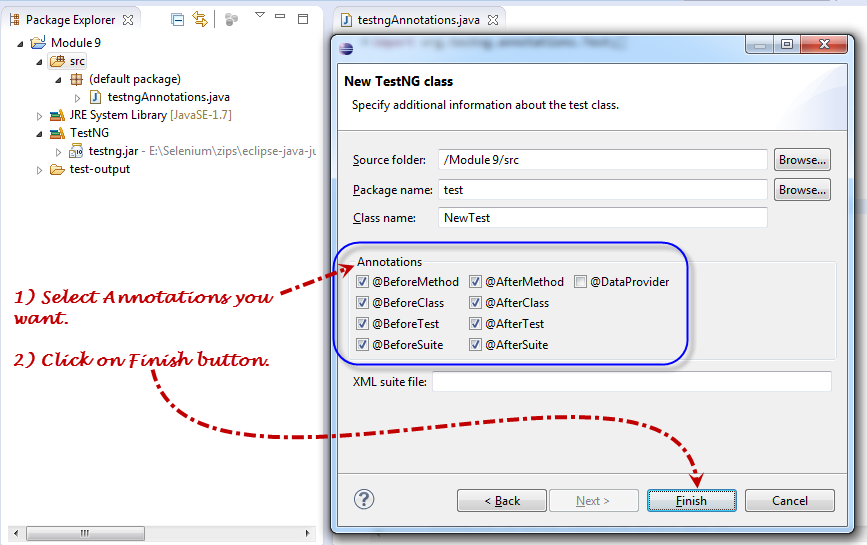
Click on Next button. Under “New TestNG Class” dialog box all TestNG supported annotations are displayed. You can enter Package name, Class name and select the annotations functions what you want to include in the test script.
Now the selected annotations are added in TestNG class & we can use this script to write the code. I have updated this created script, so copy following ready script for your understanding.
Execution Procedure of TestNG Annotations:
The following example includes all TestNG Annotations, so you will come to the know which TestNG method is executed first and which method is called later.
import org.testng.annotations.Test;
import org.testng.annotations.BeforeMethod;
import org.testng.annotations.AfterMethod;
import org.testng.annotations.BeforeClass;
import org.testng.annotations.AfterClass;
import org.testng.annotations.BeforeTest;
import org.testng.annotations.AfterTest;
import org.testng.annotations.BeforeSuite;
import org.testng.annotations.AfterSuite;

public class SampleTest {

// test case 1

@Test
public void testCase1() {
System.out.println("Executing test case 1");
}

// test case 2

@Test
public void testCase2() {
System.out.println("Executing test case 2");
}

@BeforeMethod
public void beforeMethod() {
System.out.println("Executing beforeMethod");
}

@AfterMethod
public void afterMethod() {
System.out.println("Executing afterMethod");
}

@BeforeClass
public void beforeClass() {
System.out.println("Executing beforeClass");
}

@AfterClass
public void afterClass() {
System.out.println("Executing afterClass");
}

@BeforeTest
public void beforeTest() {
System.out.println("Executing beforeTest");
}

@AfterTest
public void afterTest() {
System.out.println("Executing afterTest");
}

@BeforeSuite
public void beforeSuite() {
System.out.println("Executing beforeSuite");
}

@AfterSuite
public void afterSuite() {
System.out.println("Executing afterSuite");
}
}
[Note: Copy paste this code & import the TestNG.jar file before executing the test script.]
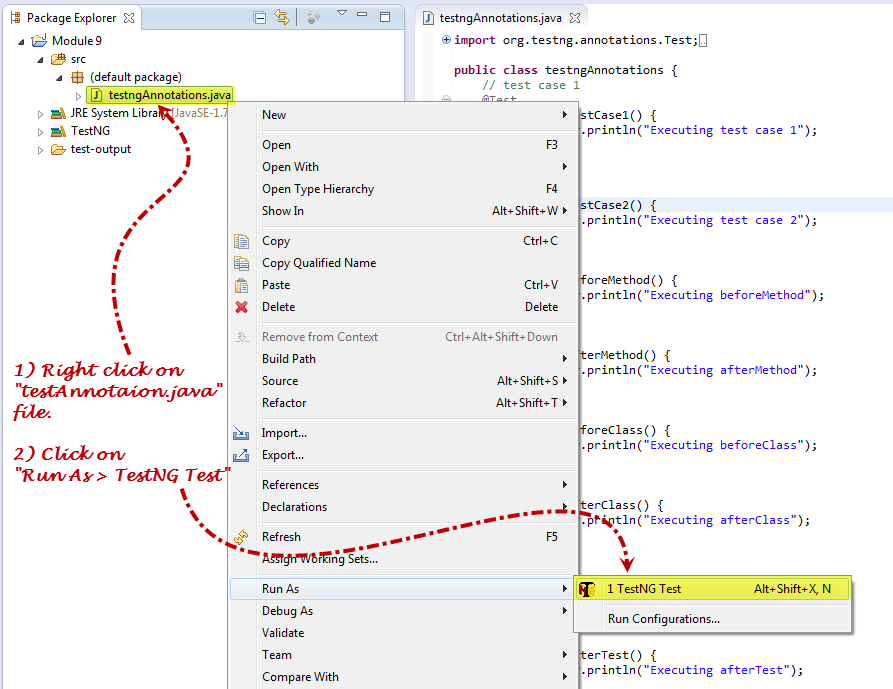
Now right click on SampleTest.java file “Run As > TestNG Test” option.
After clicking on this option both the test case will get executed. In TestNG there is no any main method, so don’t worry about how this method get executed, that’s what the TestNG is build & this is all taken care when the TestNG was got installed in the Eclipse.
If you look at the output below it has printed “testCase1” & “testCase2”, both has PASSED.
| Tests run: 2 Failures: 0 Skips: 0 |
Similarly you can add as many test cases as you want using @Test annotation. On the right hand side the new tab called “Result of running class Sample Test” will open, which represents the tree structure of test case execution.
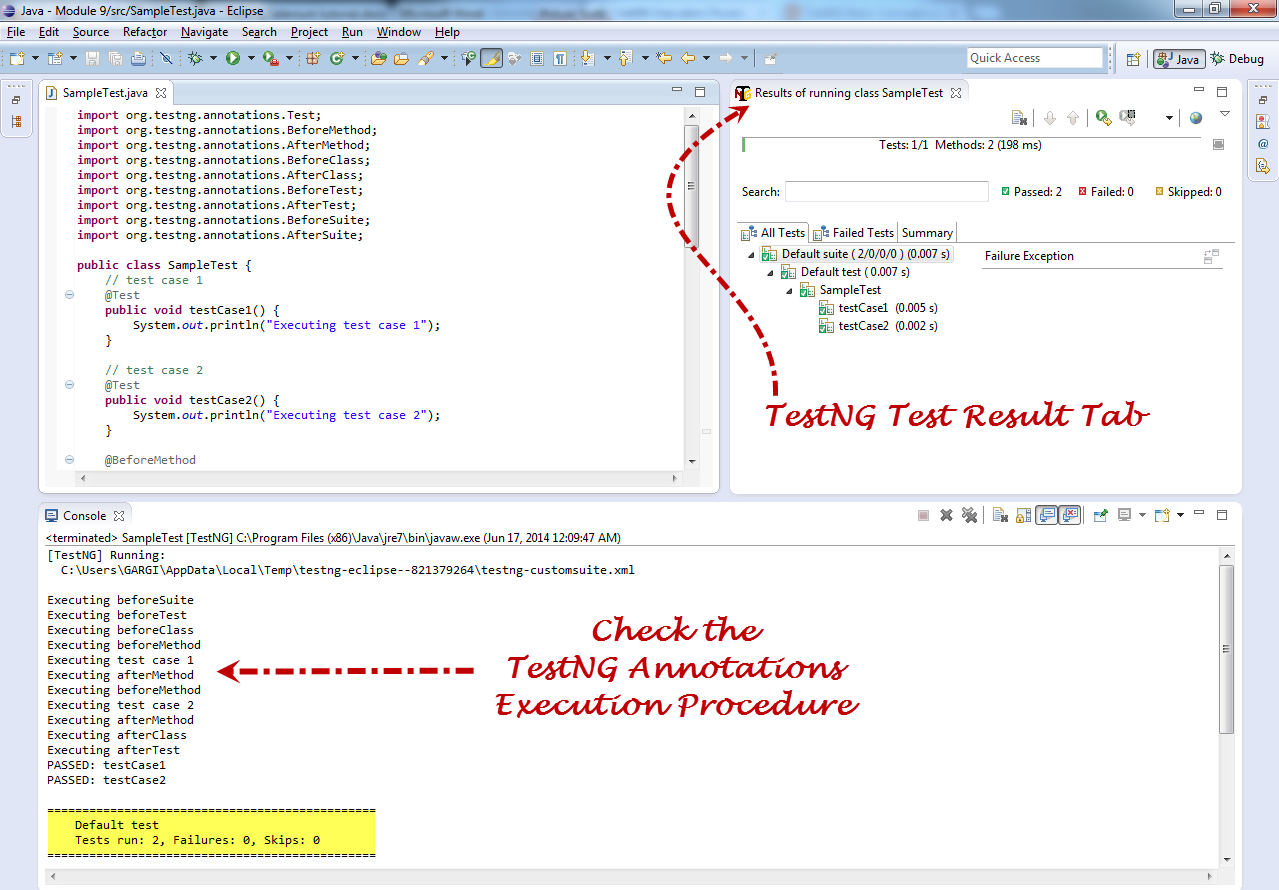
There is one more good feature of TestNG is that it generates the HTML test reports. After executing test cases right click on project & select refresh option, the new folder called “test-output” will get automatically created. This is feature in the TestNG & not present in the JUnit.
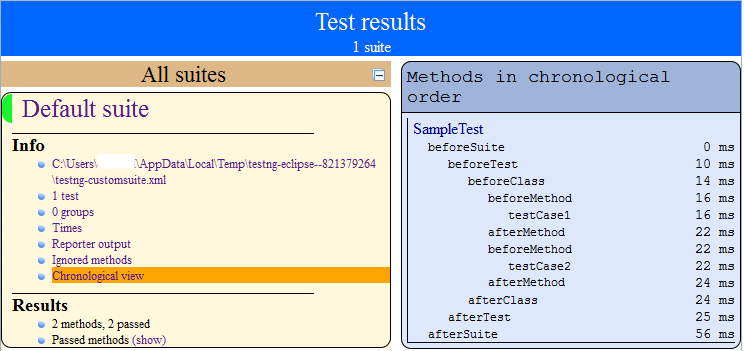
You can check the report in detailed by clicking the link present in the report. However this testing report is bit technical report. Sometimes if the test cases got failed then the report is showing exceptions as well in the detailed drill down view. In the upcoming articles we will see how to generate better reports known as TestNG XSLT reports, these reports also generate graphs as well. These special reports we will generate in the upcoming articles. So stay tuned for the latest updates on the Selenium.
⇓ Subscribe Us ⇓
If you are not regular reader of this website then highly recommends you to Sign up for our free email newsletter!! Sign up just providing your email address below:
Happy Testing!!!

4 thoughts on “Brief Introduction of TestNG – What is execution sequence of TestNG Annotations?”
Nice Paper Presentation. Excelent. Thank you Dude.
lucid and brief. may god bless u
what will happen if we include @BeforeClass
and not having tag in .xml file?
Thanks for the article on execution sequence of testng annotations.