Today we are going to see how we can record the test case using Selenium IDE & convert recorded script to Java WebDriver format & execute the automated test script using Eclipse. To start with you should have Eclipse, Java & Firefox installed on your machine. You can refer this article “How to run your first Selenium WebDriver script” to set up your environment & ready to execute your first selenium testing tool tutorial.
A. Record a Test case using in Selenium IDE
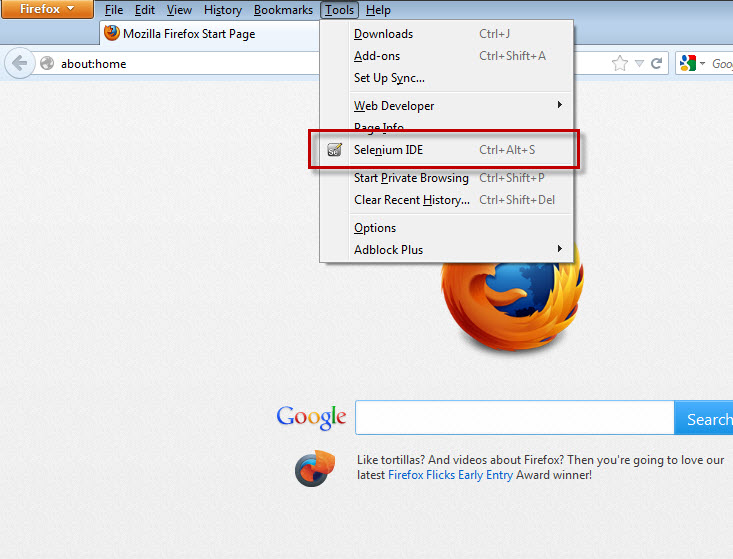
1) Launch FireFox & open to Selenium IDE by selecting “Tools > Selenium IDE” option.
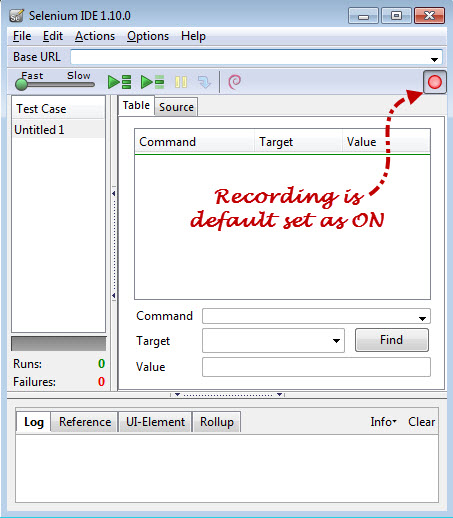
2) Make sure that Selenium IDE window is opened. In Selenium IDE the recording option is turned ON by-default.
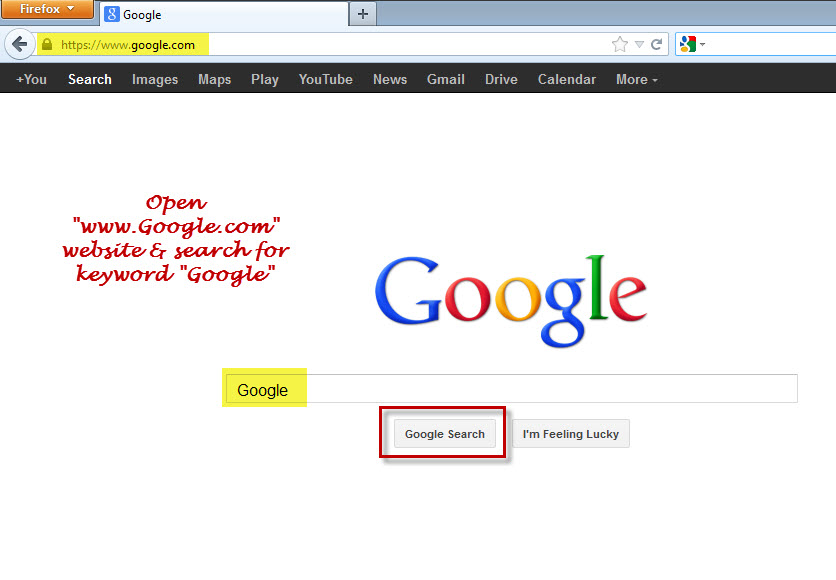
3) Launch FireFox browser & enter URL as www.google.com same as shown below:
In Google Home page enter search keyword as Google and click on “Google Search” button as shown below:
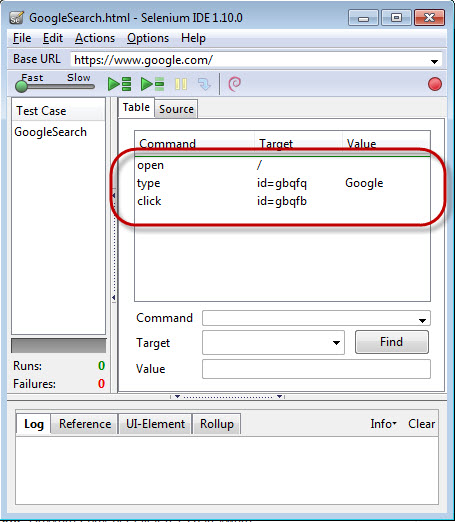
4) Once the recording is done, you will able to see the recorded command in the command section. Turn off the recording option same as mentioned below. Upto this point you have successfully recorded script in Selenium IDE.
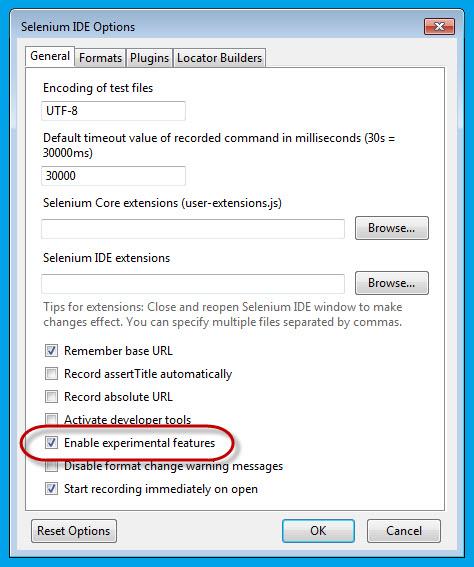
B. “Enable Experimental Features” from Selenium IDE options
1) Navigate to Options > Options
In Selenium IDE option, select “Enable Experimental Features” check box.
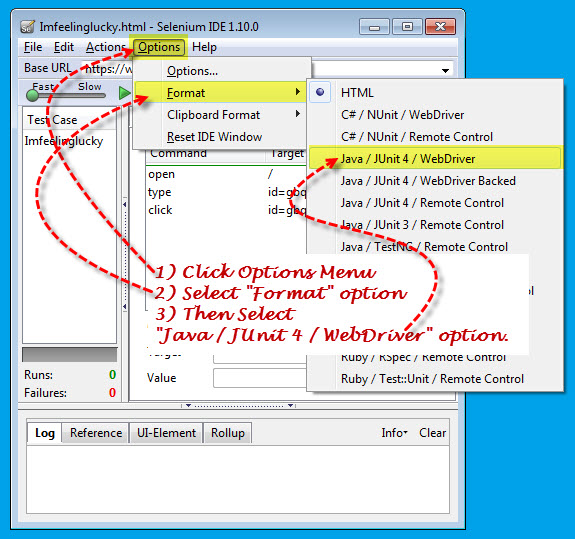
2) Navigate to Options > Format & select the “Java/ Junit 4 / WebDriver” option.
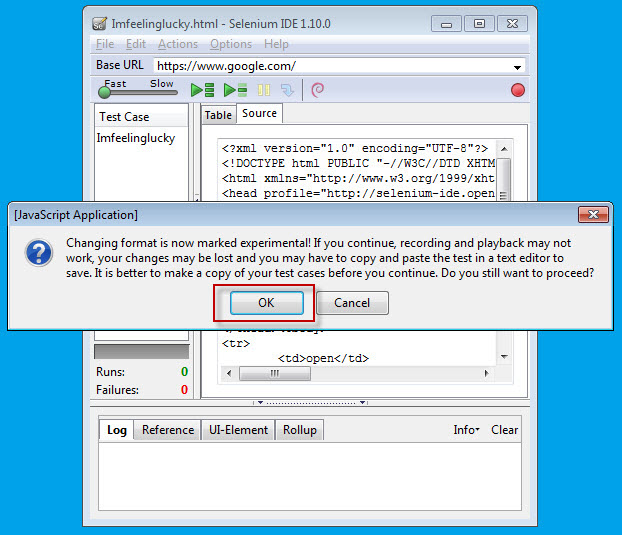
3) JavaScript Application dialog will be display. Click on OK button.
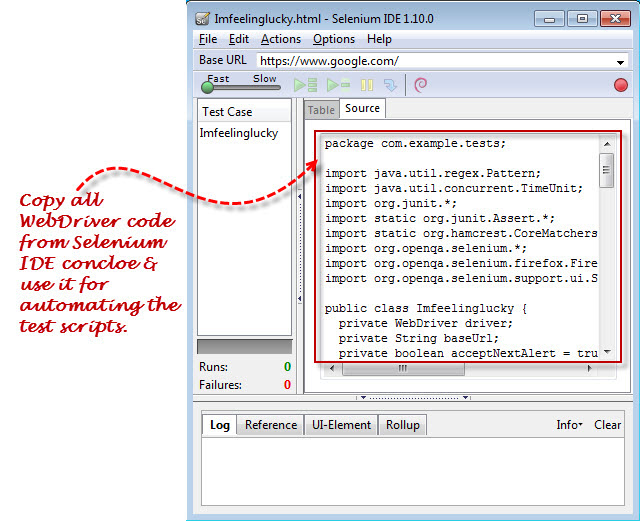
4) Now you will able to see the Java code is displayed in Selenium IDE – Source tab. This code will be used for creating Selenium WebDriver code.
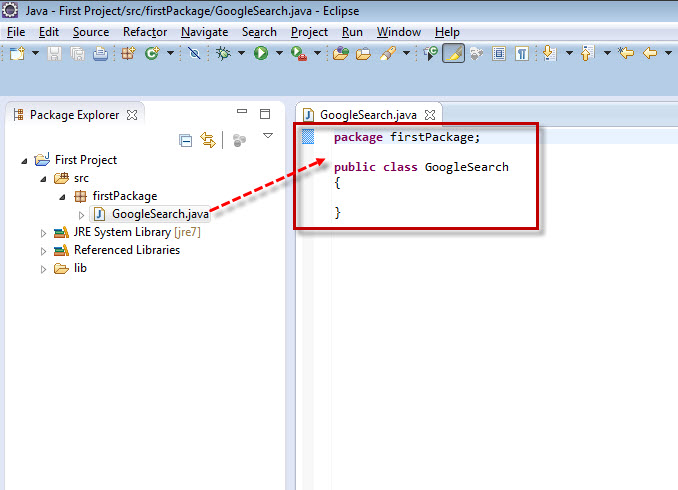
C. Create “firstPackage” under Selenium WebDriver project
1) In previous article we have learnt about “How to Create Project in Eclipse IDE?”
Launch Eclipse IDE & open same project created in above step.
Right click on project name select option, New > Package.
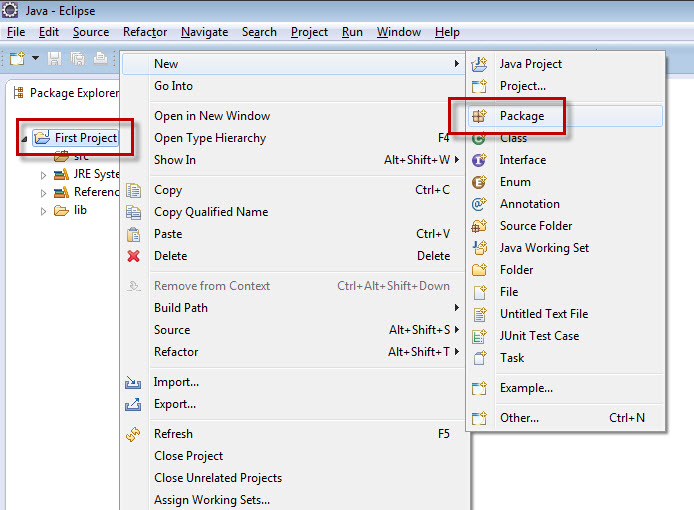
2) In New Java Package dialog enter Name as “firstPackage”

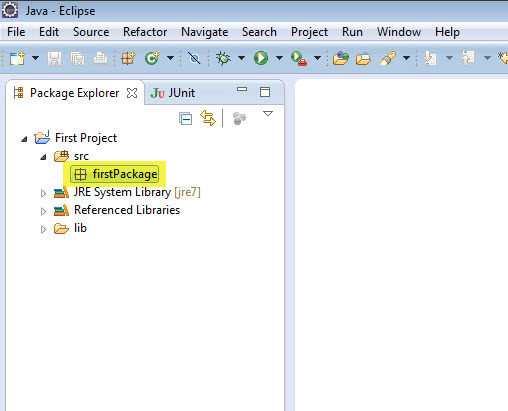
3) Once you created the first package, ensure that it is added under “src” folder same as below:
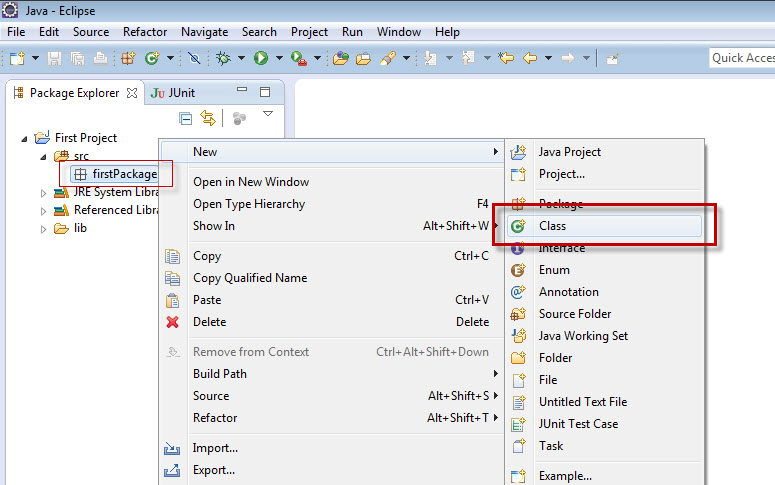
4) Right click on newly created package “firstPackage” select option, New > Class.
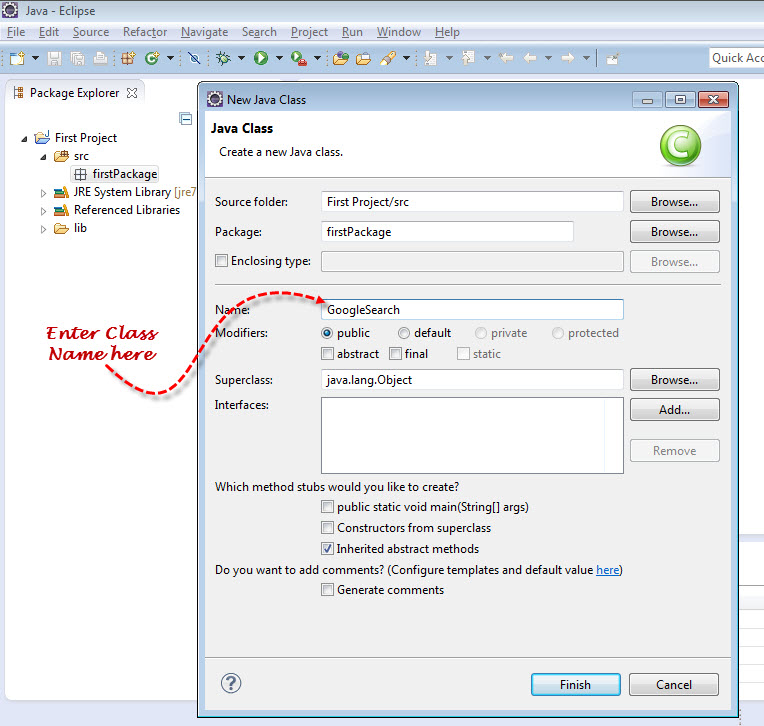
5) In New Java Class dialog box enter class name in Name text box as “GoogleSearch” shown in below screenshot:
6) Once you created the “GoogleSearch” class, ensure that it is added under “firstPackage” folder same as below:
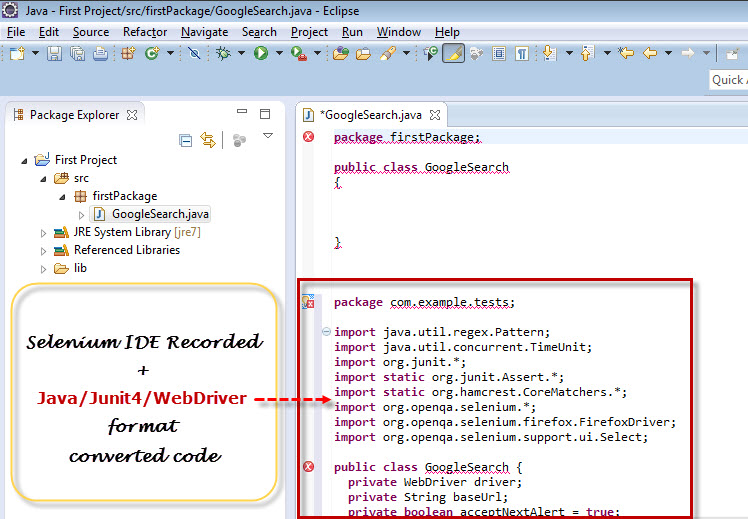
6) Now copy the Java/Junit4/WebDriver format converted code to from the previously recorded in Selenium IDE Source tab (Step A4).
Without deleting existing code paste the above recorded in Selenium IDE copied code below as shown below:
7) Upon pasting the code you will display some errors in the eclipse, don’t worry in next few steps we are resolving the all errors:
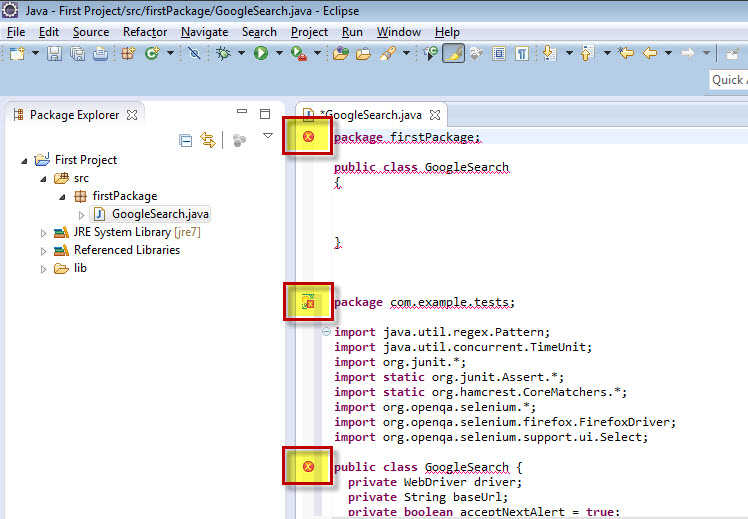
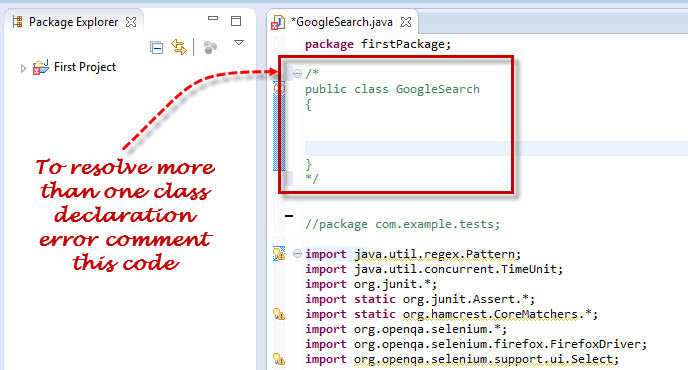
8) Now in the code you experience that there are two packages, first is “package firstPackage;” & second is the “package com.example.tests;”.
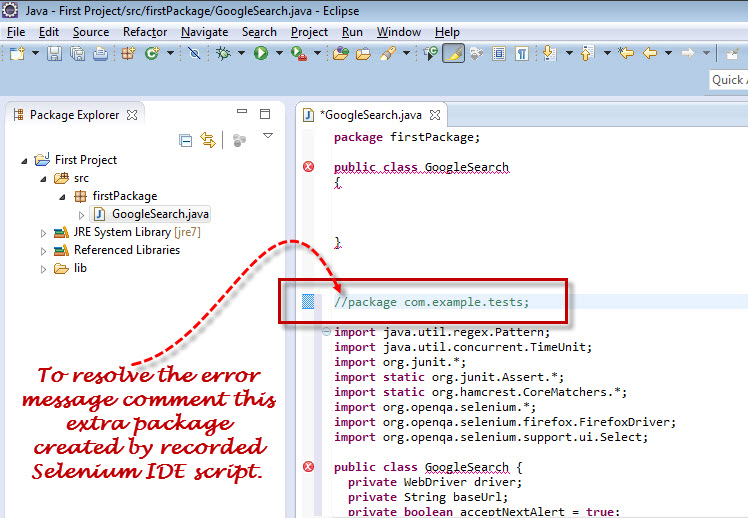
The Class is allow to declare only one package but the copied code is added new package. So copied package is not present in the Eclipse IDE, so let’s comment out the package name “package com.example.tests;”.
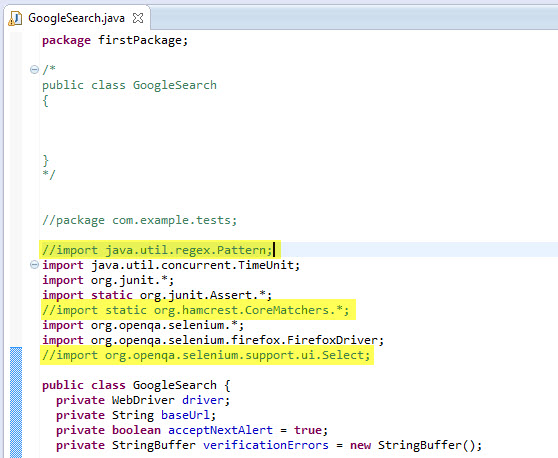
9) Once you resolve the more than one class declaration error then you will observe few warning messages as shown below:
D. Remove the warning messages
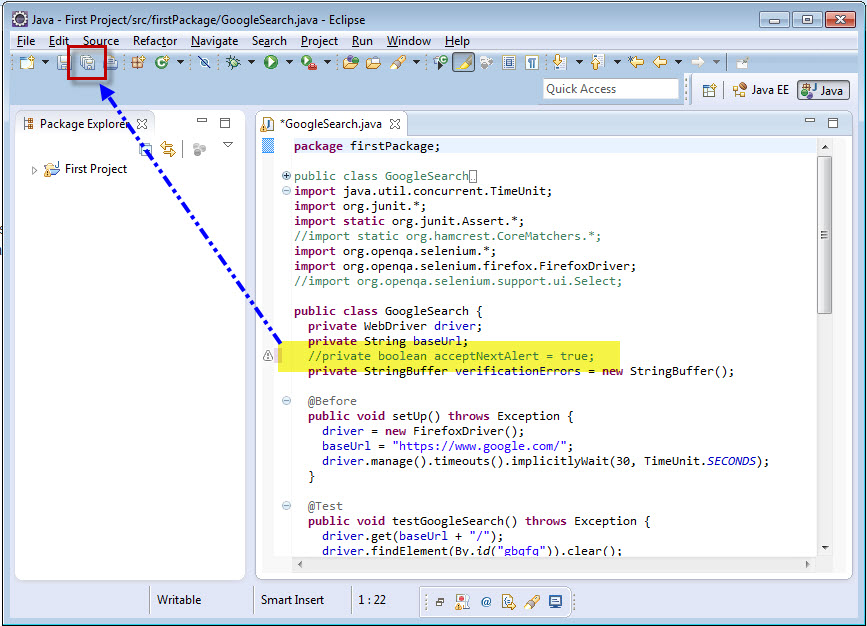
1) We can see there are three warning messages shown in the below screen shot. To remove these warning messages, remove or comment the warning message lines.
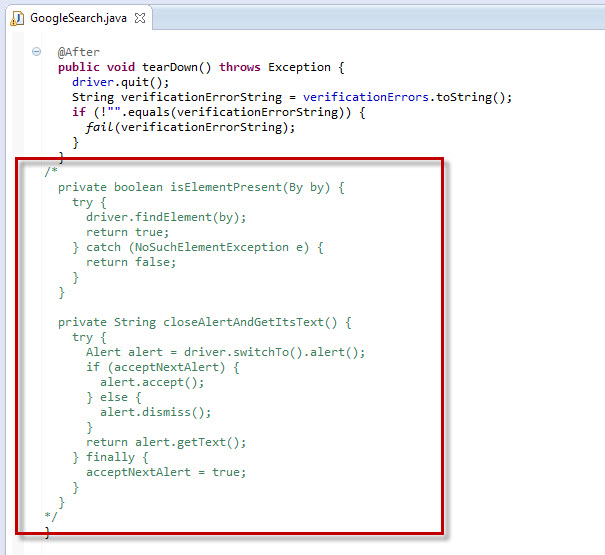
2) Two methods called isElementPresent & closeAlertAndGetItsText methods are never used locally, so let’s comment out these two method sections:
3) One more warning message will get displayed once you commenting unwanted methods:
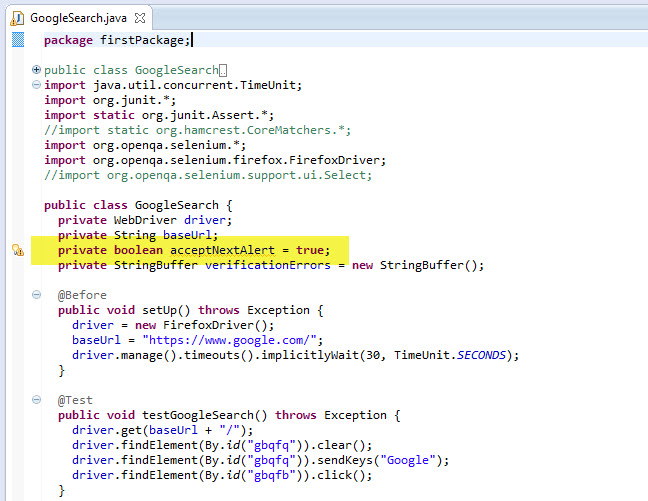
4) To resolve this problem comment out this line as this is never require while executing the code & click on Save All button shown below:
Download Code – Below is the final converted code from recorded Selenium IDE code. You can also copy below code & use directly.
package firstPackage;

//import java.util.regex.Pattern;
import java.util.concurrent.TimeUnit;
import org.junit.*;
import static org.junit.Assert.*;
//import static org.hamcrest.CoreMatchers.*;
import org.openqa.selenium.*;
import org.openqa.selenium.firefox.FirefoxDriver;
//import org.openqa.selenium.support.ui.Select;

public class GoogleSearch {
private WebDriver driver;
private String baseUrl;
//private boolean acceptNextAlert = true;
private StringBuffer verificationErrors = new StringBuffer();

@Before
public void setUp() throws Exception {
driver = new FirefoxDriver();
baseUrl = "https://www.google.com/";
driver.manage().timeouts().implicitlyWait(30, TimeUnit.SECONDS);
}

@Test
public void testGoogleSearch() throws Exception {
driver.get(baseUrl + "/");
driver.findElement(By.id("gbqfq")).clear();
driver.findElement(By.id("gbqfq")).sendKeys("Google");
driver.findElement(By.id("gbqfb")).click();
}

@After
public void tearDown() throws Exception {
driver.quit();
String verificationErrorString = verificationErrors.toString();
if (!"".equals(verificationErrorString)) {
fail(verificationErrorString);
}
}
/*
private boolean isElementPresent(By by) {
try {
driver.findElement(by);
return true;
} catch (NoSuchElementException e) {
return false;
}
}

private String closeAlertAndGetItsText() {
try {
Alert alert = driver.switchTo().alert();
if (acceptNextAlert) {
alert.accept();
} else {
alert.dismiss();
}
return alert.getText();
} finally {
acceptNextAlert = true;
}
}
*/
}
Here we have completed updating the Selenium WebDriver code in Eclipse. Before executing the script please make sure that Firefox browser is installed in your machine as we have used Firefox browser libraries. When you click on Run icon (Ctrl+F11) then your Selenium WebDriver code will be executed successfully.
Conclusion:
1) We have recorded a Test case using in Selenium IDE recording feature.
2) “Enable Experimental Features” from Selenium IDE options & converted generated HTML code to JUnit 4/Java/WebDriver format.
3) In Eclipse, created “firstPackage” & Class under Selenium WebDriver project & pasted above automated generated code in class.
4) One by one resolved all error & warning messages observed in code.
Full Access to Selenium Training Series
If you like this Selenium Automation article and you would also like to subscribe to our software testing email newsletter for software testing latest updates , please enter your email below:
⇓ Subscribe Us ⇓
If you are not regular reader of this website then highly recommends you to Sign up for our free email newsletter!! Sign up just providing your email address below:
Happy Testing!!!

23 thoughts on “How to create Selenium WebDriver Test using Selenium IDE? – Selenium Tutorial”
Thanks for sharing the post
Can you please send me the link to download the selenium?
Can you please tell me “how to write selenium script without using Selenium IDE recording”, that would really help a lot.
Thanks in advance!!!
Hi,
Good article.. i m in manual testing how can i improve myself in automation?
Hi. I have 12 months of experince in manual testing.I know the basics of JAVA and SQL.
Now i got opprtunity in 1.ETL Testing and 2.Automation testing ( SELENIUM ).
Please advice which one to choose for better career growth.
really its very useful for testing people who want to start selenium automation. articles r very interesting n used simple words to understand nice work.
thanks a lot. keep it up!
Nice article….
I am working in a manual testing, Can you please share me the difference between qtp & selenium?
Good one!!!
Great article.. Encourages one to learn automation. Put on here on right time, Thanks
Yes, it’s really needful article for who need to start selenium automation testing.
Looking for more articles on selenium WebDriver.
Simply Superb!!! :)
very useful post as a beginner in automation it is very easy to learn from this site …Thank u Great effort keep posting such useful info…
This is nice one and easy to learning for automation testing…keep more info
why the given code do not work when we use Chrome driver instead of Firefox Driver. how to settle out this problem. m using Windows7 OS.
if I created more than one selenium script , how would I bundle them to run as a test suite in Eclipse?
Really helpful article to the beginners,thank you so much.Keep it on.
Its such very helpful tutorial for the beginner like me . But when i used this code it display “sendKeys” error. I have tried to resolve this error many times but didnt get any solution. So can anyone suggest me the right solution.
See the error listed below:
driver.findElement(By.name(“email”)).sendKeys(“example@gmail.com”);
The method sendKeys(CharSequence…) from the type WebElement refers to the missing type CharSequence
I am using your site at work, and I just wanted to thank you for putting this together. Amazing resource!
Its not working.
Plz provide step by step to implement Selenium IDE to Webdriver script.
It shows missing main method error. When i use main method it shows full error.
Nice one!!
Please provide me process that how can I perform assertion of an object using selenium IDE recording.
There is lot of failures under failure trace
Thanks for sharing this information.
please post how we can use Selenium IDE exported test script for maven testNG project using Page object model