Welcome back to Selenium Tutorial series. If you missed any article in Selenium series then you can also check the article on Selenium WebDriver
In this chapter, we are going to discuss on how to do the Database Testing using Selenium WebDriver. As we are aware that WebDriver API is only good to test a web application using various web browsers, therefore, in order to include database testing i.e. storing or retrieving test data from the database we need to use the JDBC Connection (“Java Database Connectivity”).
What is JDBC (Java Database Connectivity)?
It is a Java API which interacts with the database after procuring a database connection and executing SQL statements. This API connects the Java Programming languages with various databases with the help of their database drivers. Following are the classes and interfaces that are provided by the JDBC API.
1) Driver Manager: This class returns a database connection object after accepting DB connection URL, username and password.
2) Driver: This is database specific driver that helps in creating JDBC connection with the database.
3) Connection: It is an interface that is able to provide information describing its table, its supported SQL grammar, its stored procedures, the capabilities of this connection and so on.
4) Statement: It is an interface to the pre-compiled object that is used to efficiently execute SQL statements into the database.
6) SQLException: It is an exception class that defines the various SQL exceptions. When we execute any SQL statement via JDBC connection then it is mandatory to catch SQL exception through this class.
Example of Database Testing Using Selenium WebDriver and JDBC
MySQL Database and workbench Installation:
Check out the article: MySQL Database and workbench Installation steps
JDBC Connection, Eclipse Setup, and Selenium WebDriver:
As discussed earlier in this chapter, we need a driver class to load in order to create a JDBC connection. The SQL connector driver class can be downloaded from below link.
https://dev.mysql.com/downloads/connector/j/
Once you download the zip file ‘mysql-connector-java-5.1.39.zip’, unzip to see the jar inside which is our actual driver file.
Following are the steps to setup eclipse for JDBC Connection.
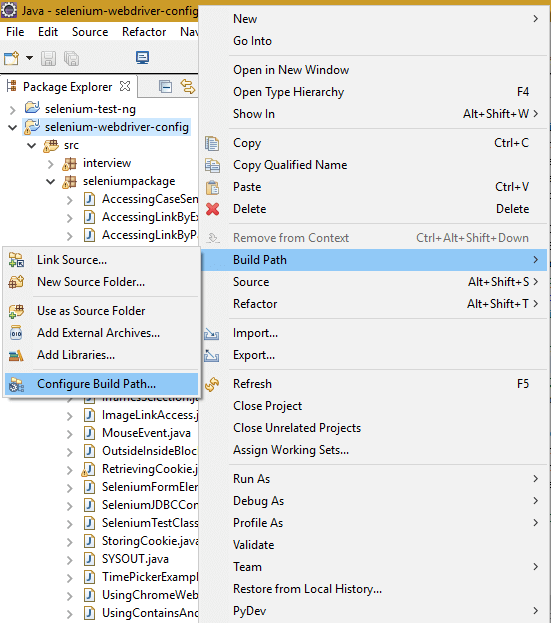
STEP 1: Right-click on the selenium package and navigate as ‘Build Path’ > ‘Configure Build Path…’ as shown below.
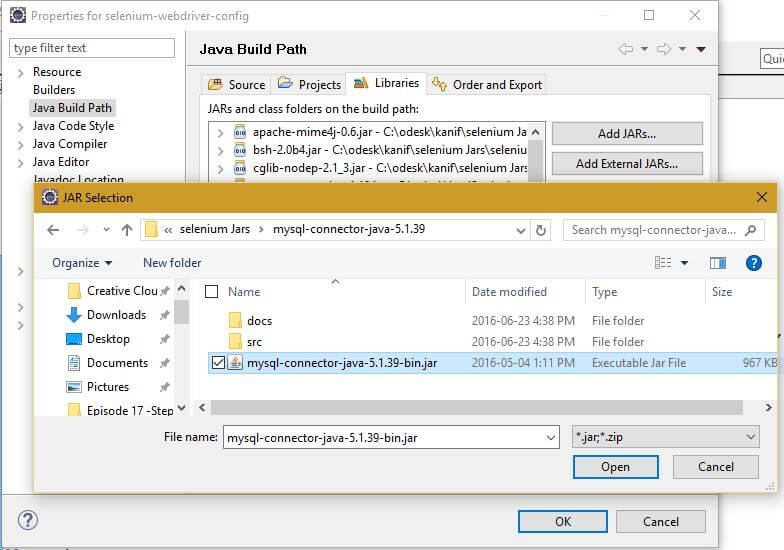
STEP 2: Click on the ‘Libraries’ tab and click on the ‘Add External JARs…’ button and select the path when we have downloaded and unzipped ‘mysql-connector-java-5.1.39.jar’ file as shown below. Click on the Open button to complete this step.
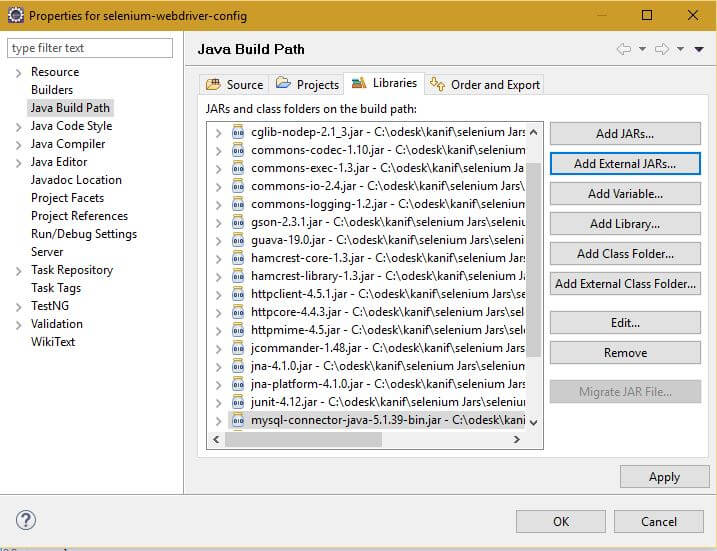
STEP 3: Click on the OK button to finish the build path set up as shown below.
STEP 4: Once driver class is set up, execute the test script as shown below. In the below Java Program, we are doing the following.
package seleniumpackage;

import java.sql.Connection;
import java.sql.Statement;
import org.openqa.selenium.WebDriver;
import org.openqa.selenium.firefox.FirefoxDriver;
import java.sql.ResultSet;
import java.sql.DriverManager;
import java.sql.SQLException;

public class SeleniumJDBCConnection {
public static final String QUERY = "select * from WEB_TESTING;";
public static void main(String[] args) throws ClassNotFoundException, SQLException {
String baseWebUrl = "";
String expectedWebsiteTitle = "";
Class.forName("com.mysql.jdbc.Driver");//Load MySQL JDBC driver
//Create Connection to DB
Connection con = DriverManager.getConnection("jdbc:mysql://localhost:3306/webtesting", "MySQLDatabase","softwaretestingclass");
Statement stmt = con.createStatement(); //Create Statement Object.
ResultSet rs= stmt.executeQuery(QUERY); // Execute the SQL Query. Store results in ResultSet.
while (rs.next()){ // While Loop iterates through all data present in a table.
baseWebUrl = rs.getString(1);
expectedWebsiteTitle = rs.getString(2);
}
con.close();
System.out.println("baseWebUrl: "+baseWebUrl);
System.out.println("expectedWebsiteTitle: "+expectedWebsiteTitle);
WebDriver driver = new FirefoxDriver();
String actualWebsiteTitle = "";
driver.get(baseWebUrl);
actualWebsiteTitle = driver.getTitle();
if (actualWebsiteTitle.contentEquals(expectedWebsiteTitle)){
System.out.println("Test has Passed!");
} else {
System.out.println("Test has Failed!");
}
driver.close();
}
}
- Make a Database connection: We are making the MySQL DB connection after loading the JDBC driver and with the help of ConnectionManager This class requires URL, username, and password as shown above.
- Execute SQL queries in Database via JDBC connection: We have created a SQL to select a record (here URL and title) from the database. With the help of Statement interface and ‘createStatement’ method of Connection interface, we are getting this SQL in the pre-compiled state.
- Process the return result set from the database: In this step, we are executing the pre-compiled SQL with the help of ‘executeQuery’ method which returns a result set that contains URL and title as shown above.
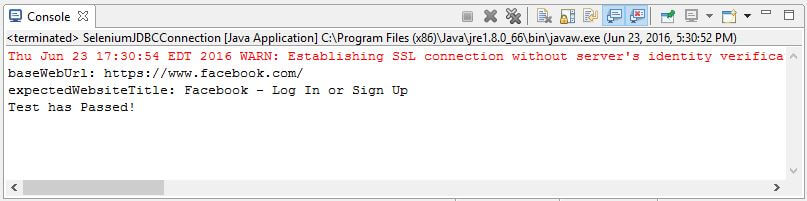
- WebDriver Web Testing: We are using the URL fetched from the database to load the website using Firefox WebDriver. The driver is fetching the title of the page that URL loads. This title is compared with the title retrieved from the database and following is the output.
Output
Since title retrieved from the database matches with the title fetched from the website, therefore our test script has printed Test has Passed! On the console as shown below.
Conclusion
In this chapter, we have learned how to create JDBC connection and used the database retrieved values in testing by using Selenium WebDriver.
Please post your queries, related to Database Testing using Selenium WebDriver, if you have any.
Happy Testing!!

2 thoughts on “Step by Step Guide on Database Testing using Selenium”
Thanks, never had opportunity to do database testing, however it is very interesting article.
Fruitful article, Thanks !