In the last couple of months we received many requests for TestLink tutorial series from our readers, so today we are publishing TestLink tutorial series. Click next link to check out “TestLink Tutorial Series For Beginner to Advanced” topics we are covering.
Note: If you want to refer any new topic for tutorial series or any article then follow this link: Suggest a Tutorial.
***************************************
In this TestLink (Test Management Tool) tutorial series we are going to cover topics:
Tutorial 1 – Getting started with TestLink and its Advantages
Tutorial 2 – Testlink installation and Creation of a new Test Project
Tutorial 3 – Build Creation in TestLink
Tutorial 4 – Creating Testsuite and Testcase in TestLink
Tutorial 5 – Assigning test case to test plan
Tutorial 6 – Creating Users and Assigning Roles in TestLink
Tutorial 7 – Writing Requirements in TestLink
Tutorial 8 – Executing a test case in TestLink
Tutorial 9 – Generating Test Reports in TestLink
Tutorial 10 – Importing and Exporting Test case Test Suite in TestLink
***************************************
Tutorial 1: Getting started with TestLink and its Advantages
Introduction
TestLink tool is an open source test management tool. The tool is built on PHP language and it is a web-based application which operates on Web Server. As a powerful test management tool, it allows creating multiple users with different roles. Admin is the user role which manages the other user roles as well as various test cases assignment task. TestLink tool allows to create the test project and it is capable to document various test cases. The tool also allows synchronizing both test specification and requirements specification together.
Using TestLink, the user with appropriate role can execute Test Cases through manual as well as automated method. It allows generating Test Report as well as Test Plan very swiftly. Test Reports can be generated in various desired formats which are supported by TestLink tool. These formats are Excel, MS Word, and HTML formats. TestLink tool can be integrated easily with different defect management tools such as JIRA, MANTIS, BUGZILLA, TRAC, etc. at no additional cost. As a web application, it can easily support multiple users to access its functionalities simultaneously without any hassle. The tool is designed to support the user with their appropriate credentials and assigned roles.

Downloading TestLink setup
As mentioned above, TestLink is an open source tool and can be downloaded from the link given below. It will provide you with two options. These options are either to download from SourceForge or to get a Bitnami Virtual Appliance. We have downloaded the latest available TestLink version (NEW!!!! – 1.9.16 – Moka Pot – 20170121) from SourceForge for this tutorial.
Installation and getting started with TestLink tool
The following are the steps to get the TestLink tool working on your system.
- TestLink software package will be downloaded as a zipped file with the name as testlink-1.9.16.tar. This zipped file can be unzipped this under C:\work\application folder on your local machine.
- As we know that in order to run any web application, we need an Apache Web Server. We can download Web Server and MySQL database through XAMPP which we are going to use for this tutorial. XAMPP can be downloaded from the link given below. It is an open source and can be downloaded for free.
[https://www.apachefriends.org/download.html]
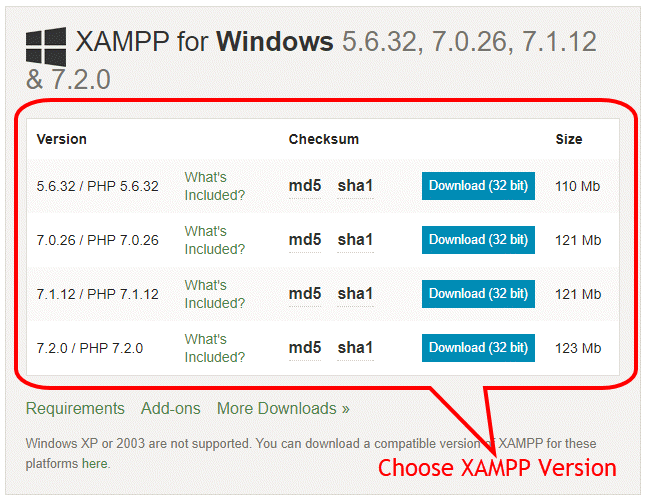
- Next, click on the XAMPP downloaded [xampp-win32-5.6.32-0-VC11-installer] exe file and accept terms and condition to proceed further, and click Next. The following dialogue box will appear.
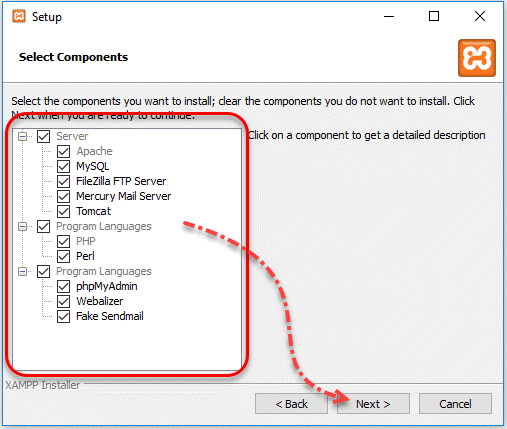
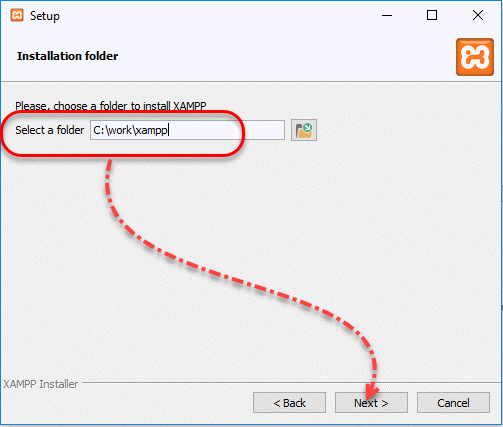
- Select all checkboxes options shown above and click on the Next button. On the next dialogue box, provide the installation path as C:\work\xampp as shown below.
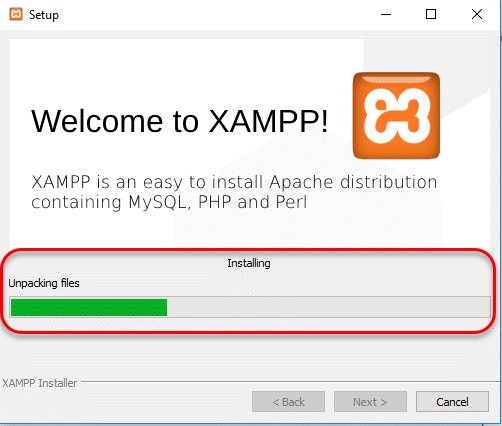
- Click Next, which will start the installation of XAMPP server on the provided installation path. This step takes a couple of minutes to finish the installation of Apache Web server, MySQL, FileZilla, mercury, and Tomcat as XAMPP application.
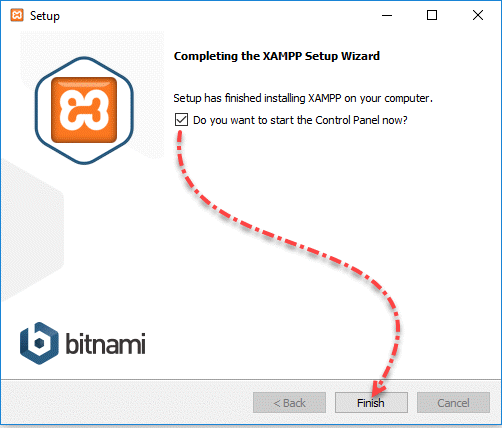
- Click on the Next button, once installation of above step is complete. It is advised to keep the checkbox selected that says “Do you want to start the Control Panel now?” which will open the XAMPP control panel immediately. Click on the Finish button to complete the installation of XAMPP application as shown below.
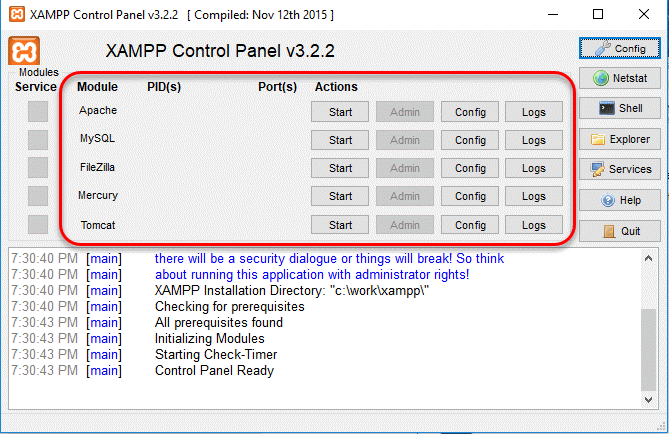
- After completion of above step, it will open up the XAMPP Control panel v3.2.2 as shown below. We can start the Apache web server and MySQL database by simply clicking on the Start button as shown below.
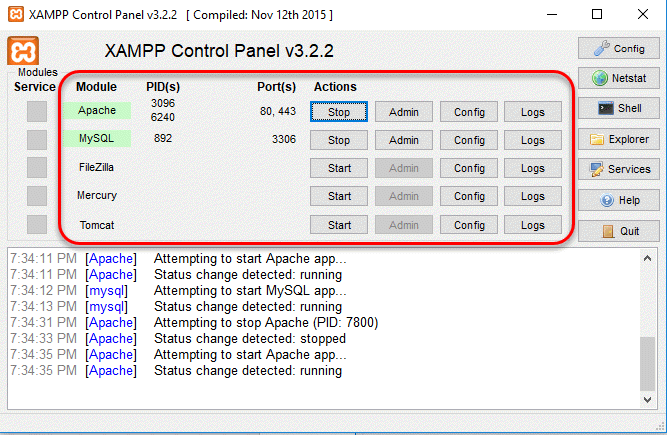
- At this point, the Apache web server and MySQL database are up and running which can be seen on the XAMPP Control panel v3.2.2. as shown below. Apache web server has started at port number 80 (default port) and MySQL database is running on port number 892.
- Next step is the deployment of the TestLink application on the Apache Web Server. We can simply copy the unzipped testlink-1.9.16 file at C:\work\xampp\htdocs directory where XAMPP server was downloaded.
- XAMPP dashboard can be accessed through this link http://localhost/dashboard/
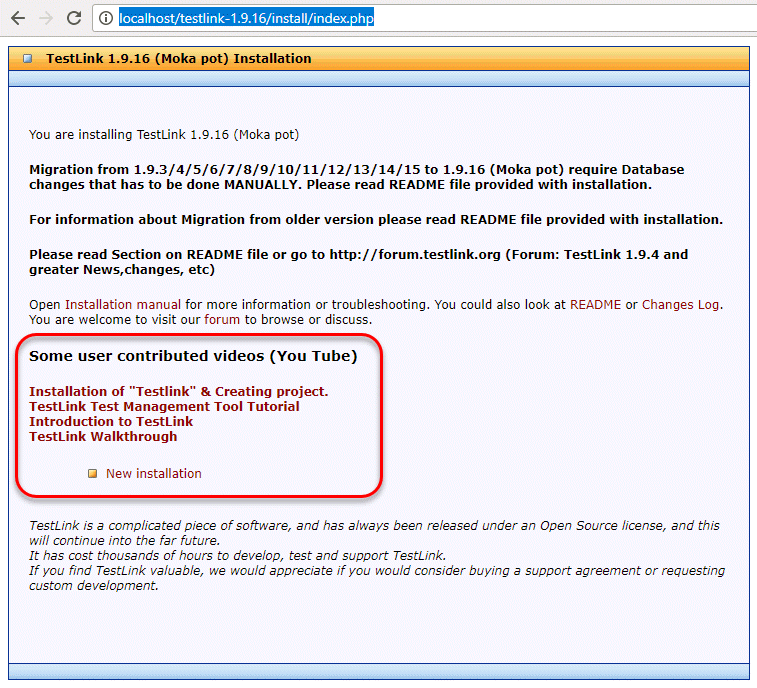
- Recently deployed TestLink can be accessed through the link http://localhost/testlink-1.9.16/install/index.php as shown below.
This will complete the installation of the TestLink tool which can be used as a Test management tool.
Advantages of TestLink
- It is an open source test management tool. Therefore, it can save the license cost to the organization which is using paid tool for test management.
- It provides support for multiple projects as a single web application.
- It allows very easy interface that allows to export and import of test cases. As a result, the test cases could be reused which can save the effort of writing the full test case for test management.
- TestLink tool can be integrated very easily with many defect management tools which may or may not be open source tools. Some of the defect management tools supported by integration are JIRA, MANTIS, BUGZILLA, TRAC, etc.
- Test cases execution can be easily handled through XML-RPC.
- TestLink tool permits an easy filtration of test cases. Test cases can be filtered through version, keywords, and Test Case ID.
- TestLink allows to create multiple users in the system and allows to assign test cases to these users easily.
- TestLink permits to generate test plan and test reports easily. Reports can be generated in various formats such as Excel, MS Word, and HTML formats.
- TestLink tool not only allows to create multiple users but also it can provide credentials to these multiple users with the assignment of various roles to them.
Disadvantages of TestLink
- TestLink does not allow the provision to test mobile applications.
- With the advancement of the web technologies and increased complexities, sometimes the tester finds it difficult to use this tool for test management.
- There are other powerful tools available in the market with increased flexibilities and options with which TestLink may not compete well.
Conclusion
In this article, we discussed TestLink tool and how it can be downloaded and installed on the web server in order to get it start working as a test management tool. TestLink is still preferred by many organizations as it is open source, saves license cost to the organization, and provide easy integration with different defect management tools.
In next article: Tutorial 2 – Testlink installation and Creation of a new Test Project
Check out all TestLink articles published on STC:
TestLink Tutorial Series For Beginner to Advanced!!
Happy Testing!!
