Test case in simple terms refers to a documentation which specifies input, pre-conditions, set of execution steps and expected result. A good test case is the one which is effective at finding defects and also covers most of the scenarios/combinations on the system under test. Here is the step by step guide on how to test case development.
1) Detailed study of the System under test
- Before writing test cases, it is very important to have a detailed knowledge about the system which you are testing. It can be any application or any website or any software. Try and get as much information as possible through available documentation such as requirement specs, use cases, user guides, tutorials, or by having hands on the software itself.
- Gather all the possible positive scenarios and also the odd cases which might break the system (Destructive testing) such as stress testing, uncommon combinations of inputs etc.
2) Written in simple language
- While writing test case, it is highly recommended to write in a simple and understandable language.
- It is equally important to write your steps to the point and accurate.
- Exact and consistent names for e.g. of forms, or fields under test must be used to avoid ambiguity.
3) Test case template
It looks like:
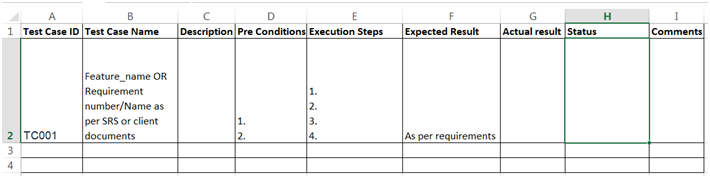
Let us look at each parameters should included good test cases:
i) Test Case ID: This field is defined by what type of system we are testing. Standard rules are as follows:
- If we are making test case for a general application which doesn’t belong to any specific module then ID would start as TC001.
- If we are making test cases for a module specific system then ID would start from MC001.
- If test case has more than one expected result then we make it as version number wise. E.g. TC001.1, TC001.2 etc. All these test cases are sub part of TC001.
In this way we can maintain all the test case IDs and if in future any requirement gets changed or added then we can just add new test cases following the standard rules without changing the test case IDs of previously written test cases.

ii) Test Case Name: This filed can contain
- Name of the feature you are testing
- Requirement number from the specifications
- Name of a particular Button or input box
- Requirement name as classified in client’s document
The main advantage of maintaining this field is, if a requirement gets changed in future then we can easily estimate how many test cases that change will affect and we change/remove the corresponding test cases accordingly.
iii) Description: This field has the summary what respective test case is going to do. It explains what attribute is under test and under what condition. E.g. If a text box is under test, which allows only number and alphabets then description can be written as “Random special characters (@, #, %,$,^,*) are entered”, if we want to test a negative scenario.
iv) Pre-Conditions: when the system needs to be in a particular base state for the function to be tested, these pre conditions should be defined clearly.
Pre-conditions could be:
- A certain page that a user needs to be on
- A certain data that should be in the system
- A certain action to be performed before “execution steps” can be executed on that particular system.
Pre-conditions should be satisfied before the test case execution starts.
v) Execution steps: These are the steps to be performed on the system under test to get the desired results. Steps must be defined clearly and must be accurate. They are written and executed number wise.
vi) Expected Results: These are the desired outcomes from the execution steps performed. Expected results should be clearly defined for each step. It specifies what the specification or client expects from that particular action.
vii) Actual result: This field has the actual outcomes after the execution steps were performed on the system under test. If the results match with the expected ones then we can just write “As expected”, otherwise we need to mentioned the exact result observed.
viii) Status: This field can have following values based on the actual result we got, they are:
- “Passed” – The expected and actual results match
- “Failed”- The actual result and expected result do not match
- “Not tested”- The test case has not been executed
- “Not Applicable”-The test case does not apply to the feature any more since the requirement changed or modified
- “Cannot be tested” – This may be because precondition is not met. There could be a defect in one of the steps leading up to the function under test.
ix) Comments: This column is for additional information. So for e.g. if status is set to “cannot be tested” then tester can give the reason in this column.
Conclusion:
Test case development hugely depends on the experience with the system under test. If tester is familiar with the system, he can write more effective test cases. Test cases should not be dependent only on the specifications given by the client, it is equally important to think from a user perspective while writing test cases. Use Step by Step guide to Test Case Development and create your own test cases.
I’m sure writing good test cases will definitely helping to identify defects in the code. Good test cases will uncover almost all defects in the system and improve quality of the software. It would be my pleasure if this article inspires you to write good test cases for your project!
⇓ Subscribe Us ⇓
If you are not regular reader of this website then highly recommends you to Sign up for our free email newsletter!! Sign up just providing your email address below:
Happy Testing!!!

8 thoughts on “Step by Step guide to Test Case Development”
This test case development guide is really superb, covered all basic steps which must included in ideal Test case.
Nice collection of list to have for writing good test cases.
Thanks for sharing details… :)
This site is awesome.. I am loving it.
Very useful information……..
Thanks a lot..
good info
could anyone please tell me test cases for Google.com
Good info ##
Really superb explanation…..heartfull thanks …